

Table of Contents
- What you need
- What WordPress sends
- Create the Catch Hook
- Create the outbound event
- Add the Mailchimp subscriber
- Permission and double opt-in
- Common mistakes
- Conclusion
A WP Zapier Mailchimp setup sends a person to your audience when they create a WordPress account. WP Zapier & Webhooks Integration posts that registration to a Zapier Catch Hook, and Mailchimp’s Add/Update Subscriber action writes the email into the audience you choose.
This is the current walkthrough. The older instructions stay at Getting Started: WP Zapier. Those steps still say MAKE A ZAP, a Settings screen, and Add/Update Existing Subscriber. The plugin has used WP Zapier → Outbound Events since version 1.5 in 2020, and Zapier’s current Mailchimp action is Add/Update Subscriber. The checks below are from the WP Zapier 2.4.1 source in this project and from Zapier’s Mailchimp help on 1 October 2026.
What you need
- A self-hosted WordPress site.
- WP Zapier & Webhooks Integration 2.4.1 or later, installed and licensed. Version 2.4.1 is the stable tag in the project readme, released 2 September 2025. Update an older copy before you connect Mailchimp. Versions before 2.4 could include a password in an outbound payload, and 2.4.1 also strips registration fields whose names contain “password” or “nonce”.
- A Mailchimp account with the audience already created. Zapier’s Mailchimp prerequisites say any Mailchimp plan, including the free plan, can connect.
- A Zapier account. On 1 October 2026, Zapier’s Catch Hook help lists that trigger on Free, Professional, Team, and Enterprise. The Webhooks by Zapier app page still marks the app Premium. The Free plan is 100 tasks a month and two-step Zaps, which is the shape of this workflow. A new Zapier account includes a 14-day Professional trial. If Publish asks you to upgrade, use that trial or a paid plan.
The same Catch Hook pattern is already written up for CRM leads in WordPress Zoho CRM Integration: Connect With Zapier.
What WordPress sends
Use the User Register trigger. User Login runs on later visits and is the wrong event for a new subscriber.
In the 2.4.1 outbound handler, a registration payload includes these user fields when the account exists:
user_iduser_emailuser_nicenameuser_registereduser_urldisplay_namerolesfirst_namelast_namenicknameuser_description
WordPress’s own registration form collects a username and an email. first_name and last_name stay empty unless your membership, checkout, or profile form saved them. Map the email from the sample Zapier actually received.
The same handler also copies posted registration fields into that payload, then drops keys named user_pass, pass1, pass2, password, and the usual nonces, plus any key whose name contains “password” or “nonce”. Check the sample before you map fields. If a password still appears, the site is not on 2.4.1.
Create the Catch Hook
Zapier creates the webhook address. Finish this step before you save the WordPress event.
- In Zapier, click Create, then Zap.
- For the trigger app, search Webhooks by Zapier.
- Set the event to Catch Hook.
- Click Continue.
- Leave Pick Off A Child Key blank.
- Open the Test tab and copy the webhook URL.
Zapier’s Catch Hook documentation puts that URL on the Test tab after the event is selected. Leave the Zap editor open.
Create the outbound event
- In WordPress, go to WP Zapier → Outbound Events → Add New.
- Title it clearly, for example
New user to Mailchimp. - In Event Settings, set Trigger to User Register.
- Paste the Catch Hook URL into Webhook URL.
- Set Webhook Status to Enabled. A new event opens on Disabled, and a disabled event does not send.
- Click Publish. The trigger, URL, and status are stored together when both the trigger and the URL are filled in. Publish again after you change either one.
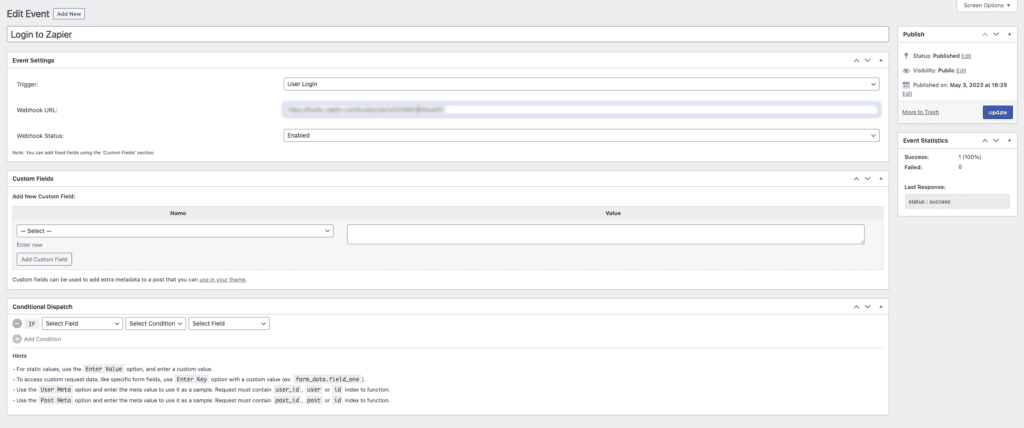
The licence key is under WP Zapier → License Settings.
Register a test user on the site, return to Zapier, and click Test trigger. You want a sample that includes user_email. Zapier shows recent hooks. If the sample is empty, the event is still disabled, the URL was saved on a different event, or the registration has not run yet.
Event Statistics on the same screen counts Success and Failed calls. The 2.4.1 sender counts a call as success when WordPress receives a non-empty response body. Use the Zapier test as the check that the sample arrived.
Add the Mailchimp subscriber
- Add an action step.
- Choose Mailchimp.
- Choose Add/Update Subscriber. That is the current action name in Zapier’s Mailchimp help. It can add a subscriber or update an existing one.
- Connect the Mailchimp account and continue.
- Choose the Audience.
- Set Subscriber Email to the sample’s
user_email. - If the action shows Update Existing, choose Yes. Zapier’s Mailchimp limitations say an attempt to add an email that is already in the audience does not proceed. Updating the existing contact avoids that stop.
- Map
first_nameandlast_nameonly when the sample contains them.
Click Test action, then open the audience in Mailchimp and look for that email. Name the Zap and click Publish.
A second action, such as Add Subscriber to Tag, makes the Zap longer than two steps. The Free plan’s documented limit is one trigger and one action. Keep the first Zap to Add/Update Subscriber unless the account is on a plan that allows another step.
Permission and double opt-in
Creating a WordPress account is not the same thing as permission to send marketing email. Send this event for people who asked to hear from you, or leave the audience on double opt-in so Mailchimp asks them to confirm.
Zapier’s Mailchimp limitations say that when the audience uses double opt-in, a person added by Zapier stays out of the subscribed audience until they confirm the email. A successful Zap test can still leave the contact pending. That is the audience setting, not a failed webhook.
Conditional Dispatch has been part of outbound events since WP Zapier 2.3. The public guide lists equals, not equals, contains, excludes, greater than, less than, before date, and after date, combined with AND. Use it when you only want the webhook for a role, an email domain, or another field your form already stores. The condition reference is Conditional Logic For Outbound Events.
Send Campaign is a different Mailchimp action. Zapier’s help says it emails the audience, a segment, or a tag. It is not the action that adds one new user.
Common mistakes
Following the 2017 click path
MAKE A ZAP, the old Settings webhook boxes, and Add/Update Existing Subscriber are the labels in the getting started article. The current path is Create → Zap, Outbound Events, and Add/Update Subscriber.
Using User Login
Login repeats. A Mailchimp audience of new accounts starts with User Register.
Copying the webhook from an old screenshot
Each Catch Hook URL belongs to one Zap. Paste the URL from the Zap you just created.
Testing Mailchimp before WordPress has registered anyone
Zapier can only map fields that are already in the sample. Register the test user, then test the trigger, then test the Mailchimp action.
Expecting a subscribed contact during double opt-in
Look in the pending contacts when the audience asks people to confirm.
Leaving the outbound event disabled
Webhook Status has to be Enabled, and the event has to be published, before a registration sends.
Conclusion
A working WP Zapier Mailchimp path is one Catch Hook, one published User Register event set to Enabled, and one Add/Update Subscriber action whose email field is user_email.
Confirm a test address in Mailchimp before you rely on it. If the audience uses double opt-in, confirm the pending contact too.
The plugin page is Zapier & Webhooks Integration. For the same outbound screen on a CRM Zap, use the Zoho CRM walkthrough. If the sample never arrives, Yoohoo support can look at the outbound event.
Would you add every new account, or only people who ticked a mailing-list box?