

Table of Contents
- What changes on the product page
- Turn it on for one product
- Minimum, maximum, and a list of amounts
- What the cart checks
- Conclusion
WooCommerce name your price is for a product where the customer should type an amount, or pick one from a short list, instead of paying a single fixed price. Name Your Price for WooCommerce adds that control on the product page, above the Add to cart button.
This how-to follows the getting started guide. The product settings also include Set Values for preset amounts.
What changes on the product page
Turn the option on for one product and three things change:
- The price line is replaced with a sentence about the amount the customer may enter.
- A field appears above Add to cart. It is a number field, or a dropdown when you have filled in Set Values.
- On shop and category pages the button says View Product and opens the product page, so the amount is chosen there rather than from the loop.
The wording on the price line depends on your settings:
- No minimum or maximum: Enter any amount.
- Minimum only: the line says Enter an amount greater than [minimum].
- Maximum only: the line says Enter an amount less than [maximum].
- Both limits: the line says Enter an amount between [minimum] and [maximum].
- Preset amounts: the line says Choose an amount.
These are the plugin’s displayed prompts, not a complete description of cart validation. With Set Values blank, the Version 1.3 source accepts the exact minimum even though the prompt says “greater than,” and rejects negative values even when the prompt says “any amount.” The number field receives the saved minimum and maximum as browser-side limits; see the cart section for the version-specific maximum caveat.
A blank minimum or a minimum of 0 allows a zero amount. A blank maximum or a maximum of 0 leaves the number field without an upper limit.
Turn it on for one product
Install the plugin from your purchase email or File Downloads and activate it. In WordPress, go to Products, edit the product, and open Product data → Name Your Price. See WooCommerce’s product management guide for the editor.
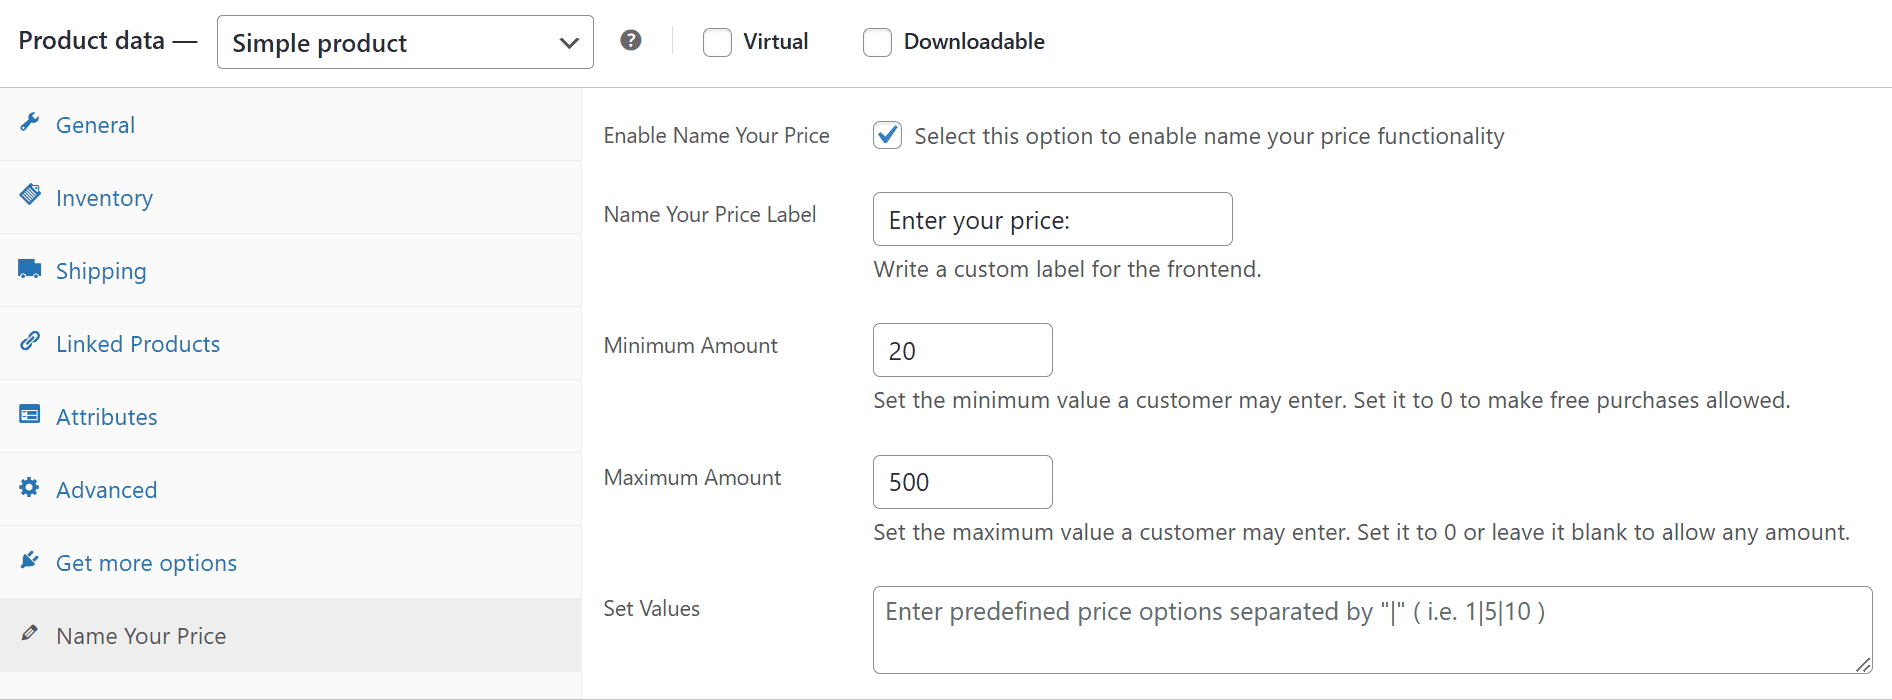
Tick Enable Name Your Price. The label field changes the text in front of the amount. Leave it blank and the field label is Enter Amount.
This guide uses WooCommerce’s standard Product data panel. The older experimental block-based New Product Editor (Beta) was deprecated in WooCommerce 10.9 and removed in WooCommerce 11.0; see WooCommerce’s retirement notice and 11.0 release notes if your screen differs.
Save the product and view it on the front end before you change a second product. The amount field should sit above Add to cart.
The licence key lives under WooCommerce → Settings → Products → Name Your Price. Paste the key from your Yoohoo account and save.
Minimum, maximum, and a list of amounts
Use a minimum when you need a floor. Use a maximum when you need a ceiling. Use both when the amount has to land in a range.
Set Values is a list of fixed choices separated by a vertical bar. The placeholder in the panel is 1|5|10.
15|25|40
When that field has at least one number, the product page shows a dropdown of those amounts and the price line says Choose an amount. The minimum and maximum are not applied as a range in that case. The plugin treats the list as the allowed amounts.
If the product’s regular price is blank, the plugin’s save handler can write a fallback value. Since that behavior depends on the saved limits, enter the regular price you want WooCommerce to store whenever that catalogue value matters.
What the cart checks
The customer submits an amount. In the Version 1.3 source copy reviewed for this guide, cart validation rejects the add when:
- The amount is below
0. - Set Values is blank and the amount is below the saved minimum.
- Set Values contains choices and the submitted amount does not match one. The notice says Amount has been modified.
An empty field is treated as 0. The Version 1.3 source copy adds the maximum as a browser field limit, but does not appear to recheck above-maximum amounts in server-side cart validation when Set Values is blank. It also casts the submitted value to a number before its numeric check, so that check does not independently reject malformed input. This source copy is not confirmed as the latest release. Test an amount above the maximum and a malformed amount on your installed version before relying on these limits.
A matching amount is stored on the cart line and used as the line price. Quantity still works as a normal WooCommerce quantity unless another plugin changes it.
If the same catalogue also needs a dispatch or availability note, that is Lead Times for WooCommerce, covered separately in How to Show WooCommerce Lead Times on a Product.
Conclusion
WooCommerce name your price is a per-product switch. Enable it, write the label a customer will understand, then pick a floor, a ceiling, or a short list. Read the product page, and one shop loop button, before you turn it on across the catalogue.
The install steps and the settings screenshot stay in the getting started guide. For a licence or a product that still shows the normal price, use the support page.