
Sometimes your site may seem slow or WordPress shows “Fatal error: Allowed memory size of 293514432 bytes exhausted (tried to allocate 2345568 bytes) in /home/xxx/public_html/wp-includes/plugin.php on line xx”. This basically is saying that your hosting account is running out of memory and increasing the WordPress memory limit will most likely solve it.
Why Is My Site Running Out Of Memory?
Web servers share a lot of similarities with normal computers. In this case, memory. Memory is required to ‘run’ your website and it’s plugins and all the great functions you may add to your site. The more advanced features you add to your site will most likely increase the memory consumption.
Think of it like running an application or video game on your home computer. Some video games may require 8GB of RAM to run while others may only require 4GB.
How To Increase My Memory Limit For WordPress
The requirements for increasing your WordPress memory limit:
- Basic knowledge of working with FTP/File Manager and navigating your WordPress installation files.
- You may need to contact your hosting provider for step number 2.
Step 1: Adding WordPress Memory Limit To WordPress
- Login to your site using FTP and navigate to your wp-config.php file.
- Edit this file with the text editor of your choice and add the following line of code in:
define( 'WP_MEMORY_LIMIT', '256M' );
Be sure that this line of code doesn’t already exist in your wp-config.php, if it does simply update the value with a higher numeric value such as ‘256M’.
The ‘256M’ refers to 256 Megabytes that WordPress is allowed to use, you can go higher than this and usually in intervals of 256 such as 256, 512, 1024 or 2048. In most cases 256M will be sufficient.
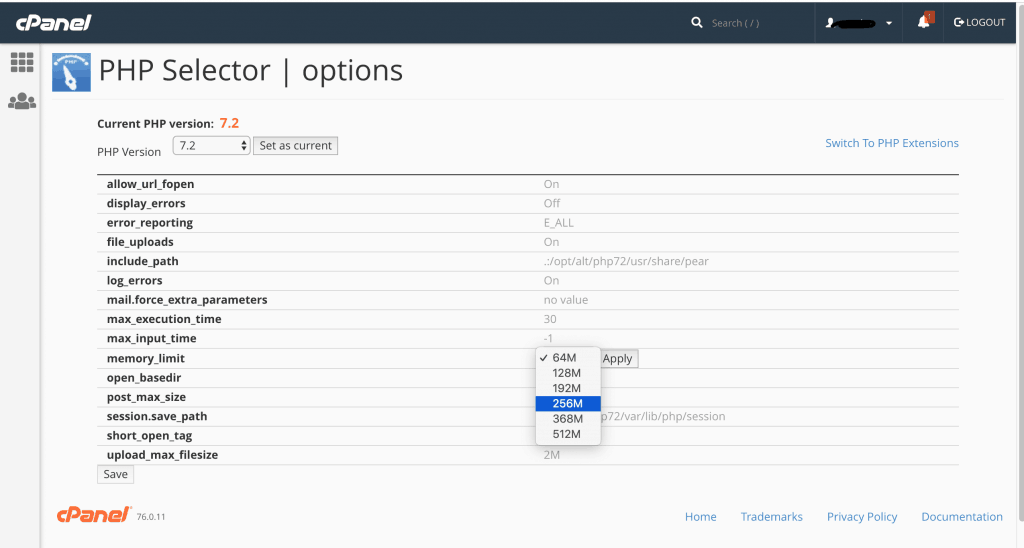
Step 2: Updating Your PHP Memory Limit
Sometimes you may need to update your PHP memory limit to let your server know that you need more memory. If you are using cPanel you’re in luck, this is very easy by following these steps:
- Login to your cPanel for your website in question.
- Navigate to “Select PHP Version” and click on this.
- Select “Switch To PHP Options” at the top right of this screen.
- Click on the value of “Memory Limit“, which may be something like “64M“
- A dropdown will appear with options, select a higher value and click apply.
- Save your settings.
Your site now should be allowed to use more memory. If these options aren’t available, we recommend in reaching out to your hosting provider.
Step 3: Edit Your PHP.ini file
If step 2 has been completed then this step can be skipped. If this error still appears, you may work through this step.
Not all hosting providers allow access to PHP.ini files, but if you do try change the line where it shows 64M to 256M: memory_limit = 256M ; Maximum amount of memory a script may consume (64MB)
Step 4: Edit Your .htaccess File
Not all hosts may give you access to your php.ini file, as mentioned above step 2 should allow you to edit your PHP memory limit so this step is optional if you are still experiencing issues.
Be sure to have hidden files visible on your FTP application as this is a hidden file found in the root directory of your WordPress installation usually.
Try add the following code to your .htaccess file: php_value memory_limit 256M
Step 5: Contact Your Host
If all else fails and you have worked through the previous steps, contact your hosting provider. As some hosting packages don’t allow you to edit these settings at all.
Conclusion
This guide will show you numerous ways on how to increase the WordPress memory limit. I’ve come across this on the lower-end / shared hosting packages quite regularly and this is a fairly quick and easy fix even for beginners. Need assistance or have any questions about memory limits? feel free to contact our knowledgable support team.
Read up more about memory limits in WordPress, be sure to check the WordPress codex out.
Photo by Mink Mingle on Unsplash