
What if I told you, that you could automate your WooCommerce sales and queue them up for the future. Think of Buffer, but for your WooCommerce store.
I present to you a new plugin (from the creators of Paid Memberships Pro) called Sitewide Sales. In this article we will cover how to run scheduled, automated sales for your WooCommerce store. Here at Yoohoo Plugins, we believe highly in automation as we know how tedious it can be to setup a sale via custom code, create a banner, maybe create a landing page and then still take it down after the sale has ended. The solution is here!
Features of Sitewide Sales
Sitewide Sales is a premium plugin, at the time of this writing, is $49 a year with a 30 day free trial! It’s definitely worth trying out and we really excited to see where this plugin will go in the future.
One Page Settings
All your sale settings are available in one place to configure the sale price, content before the sale date, after the sale date and even the popup you would like to use. The idea behind this is to let you start making money (from sales) as quickly as possible.
Realtime Sale Statistics
We love statistics at Yoohoo Plugins. Data is our fuel in which way we need to ‘drive’ our products. Find out how many people have seen your popups, visited your landing page and even converted to a customer and measure how successful your sale went.
Automated Popup Banners
Nudge potential customers to navigate to your landing page for your currently active sale. This will automatically be displayed while your sale is active and be removed when your sale is hidden.
Predesigned Landing Pages
If you struggle with designing a great landing page for your products or services, Sitewide Sales does come with predesigned landing pages to get you up and running even quicker!
Initial Setup of Sitewide Sales
After installing the Sitewide Sales plugin, there will be a new WordPress menu option in your dashboard called “Sitewide Sales“. (Be sure to checkout our guide on how to install a WordPress plugin if you’re not familiar how to install a plugin.)
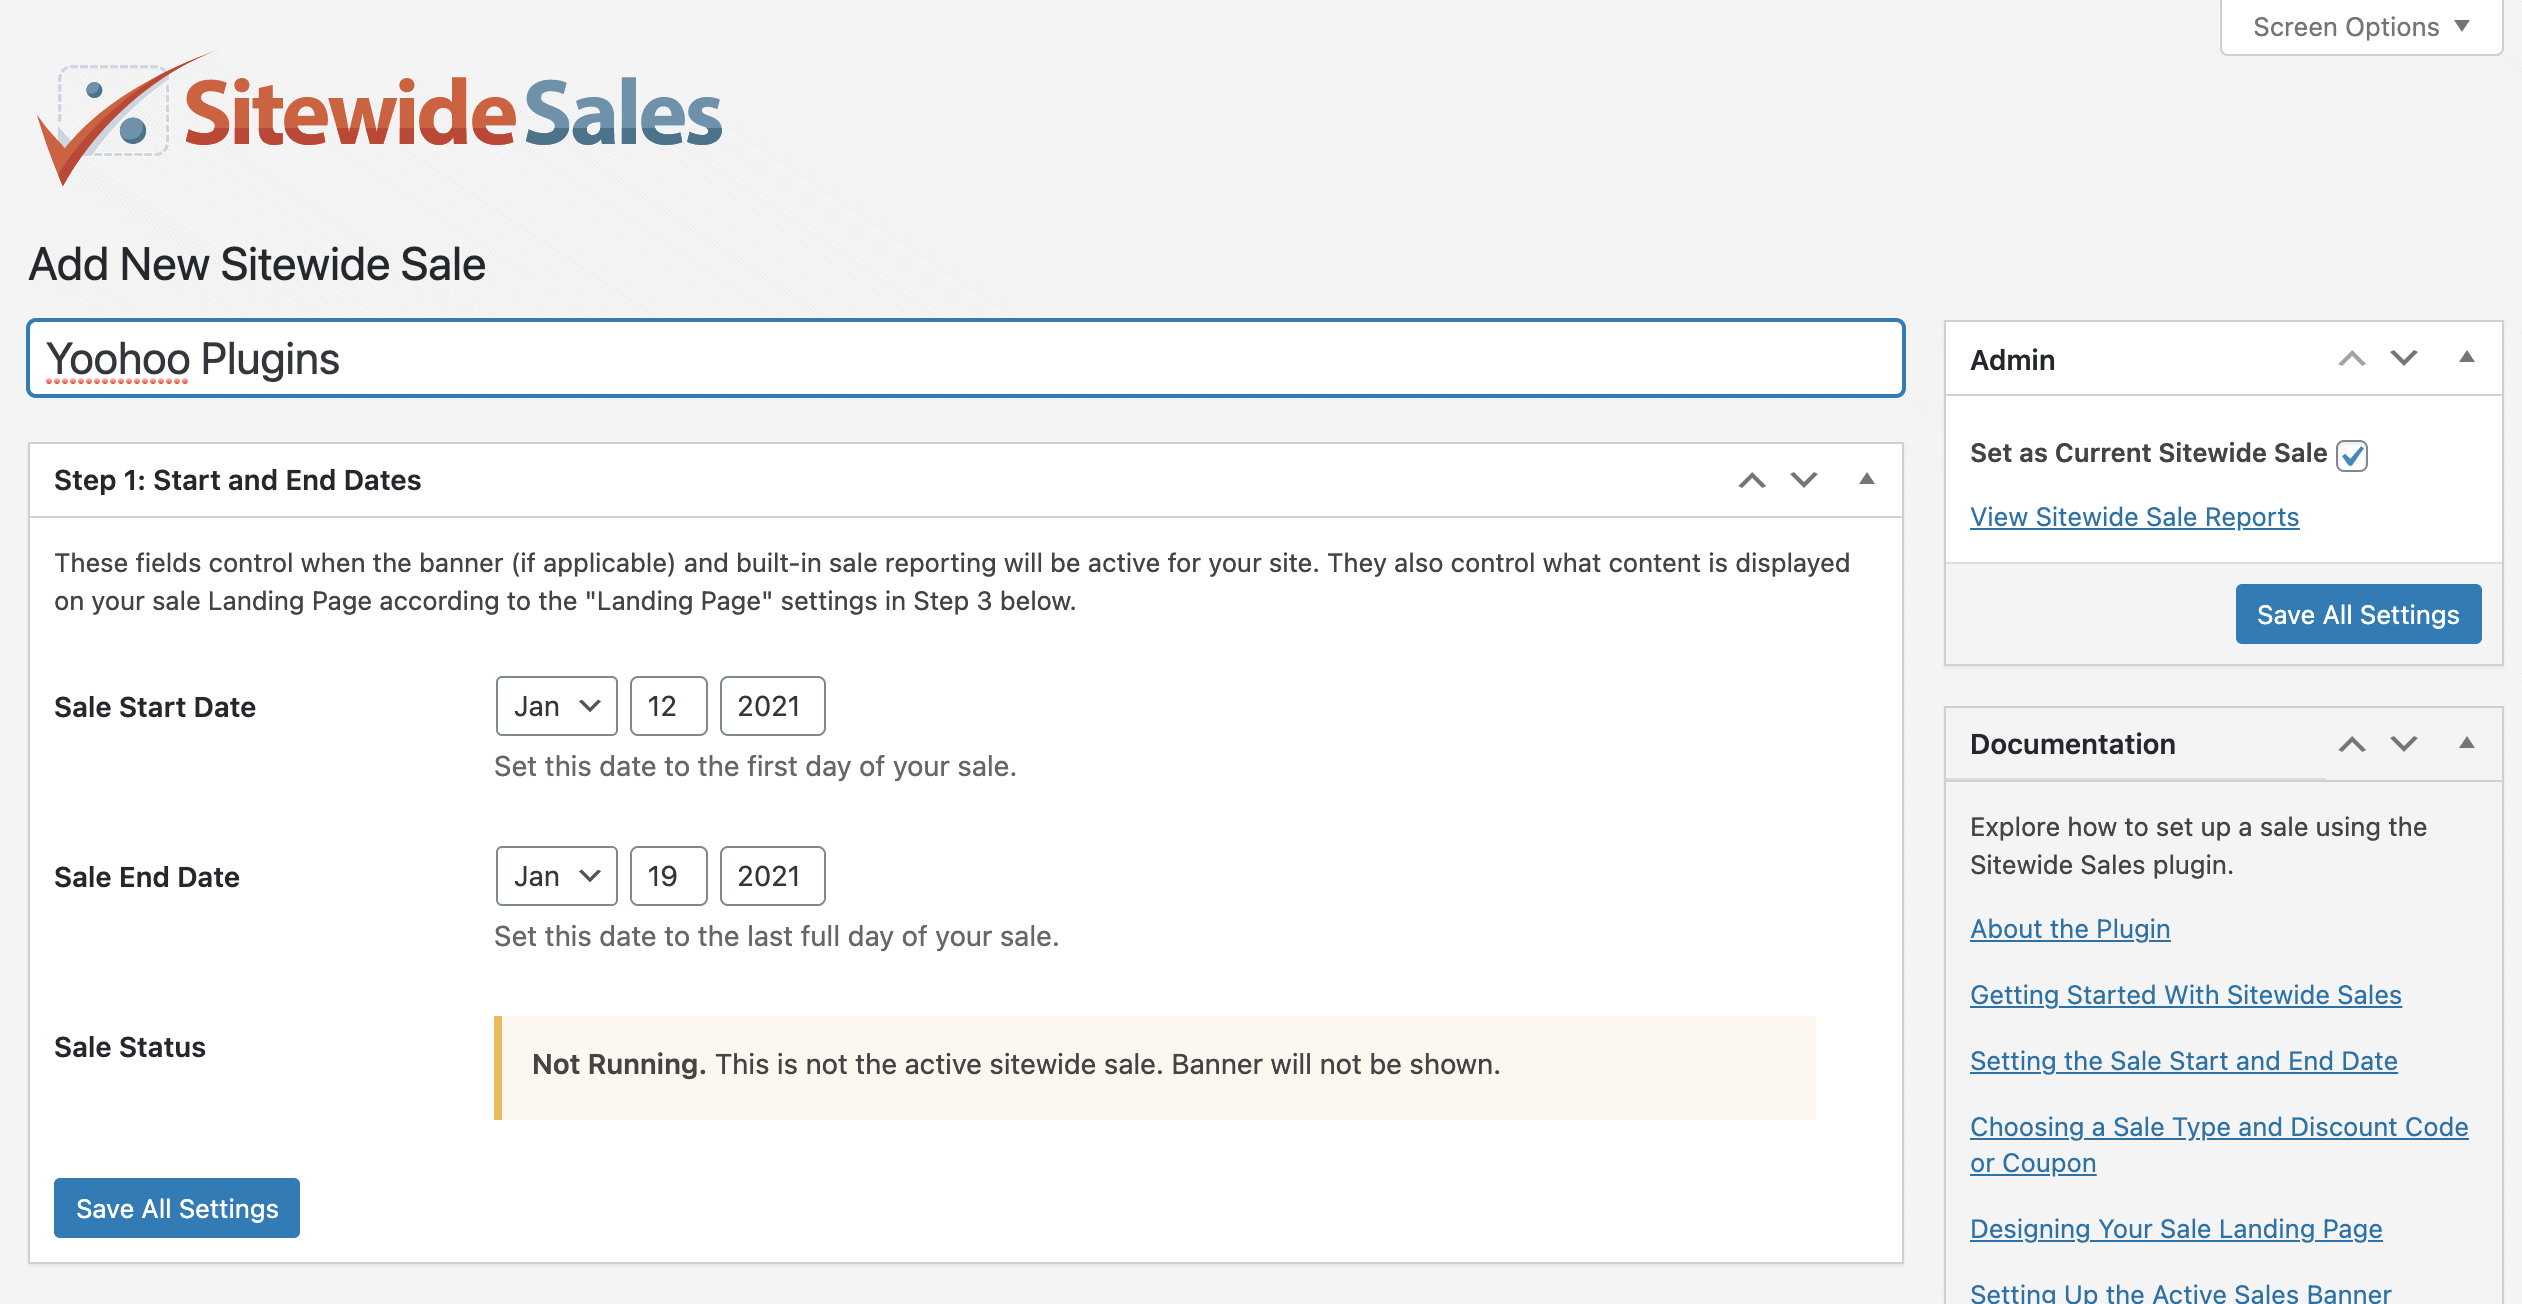
Select this menu option and then create a new automated sale by selecting the “Add New” option. Once in the settings of a sale, you may work your way from top down following each step section and entering data that you find relevant. Be sure to tittle your sale something that you may reference easily such as “Black Friday and Cyber Monday Sale 2021”.
Step 1: Start and End Dates
- Sale Start Date: When you would like the date of the sale to start. This can be any future or past date.
- Sale End Date: When you want this specific sale to end. Only present or future dates are allowed.
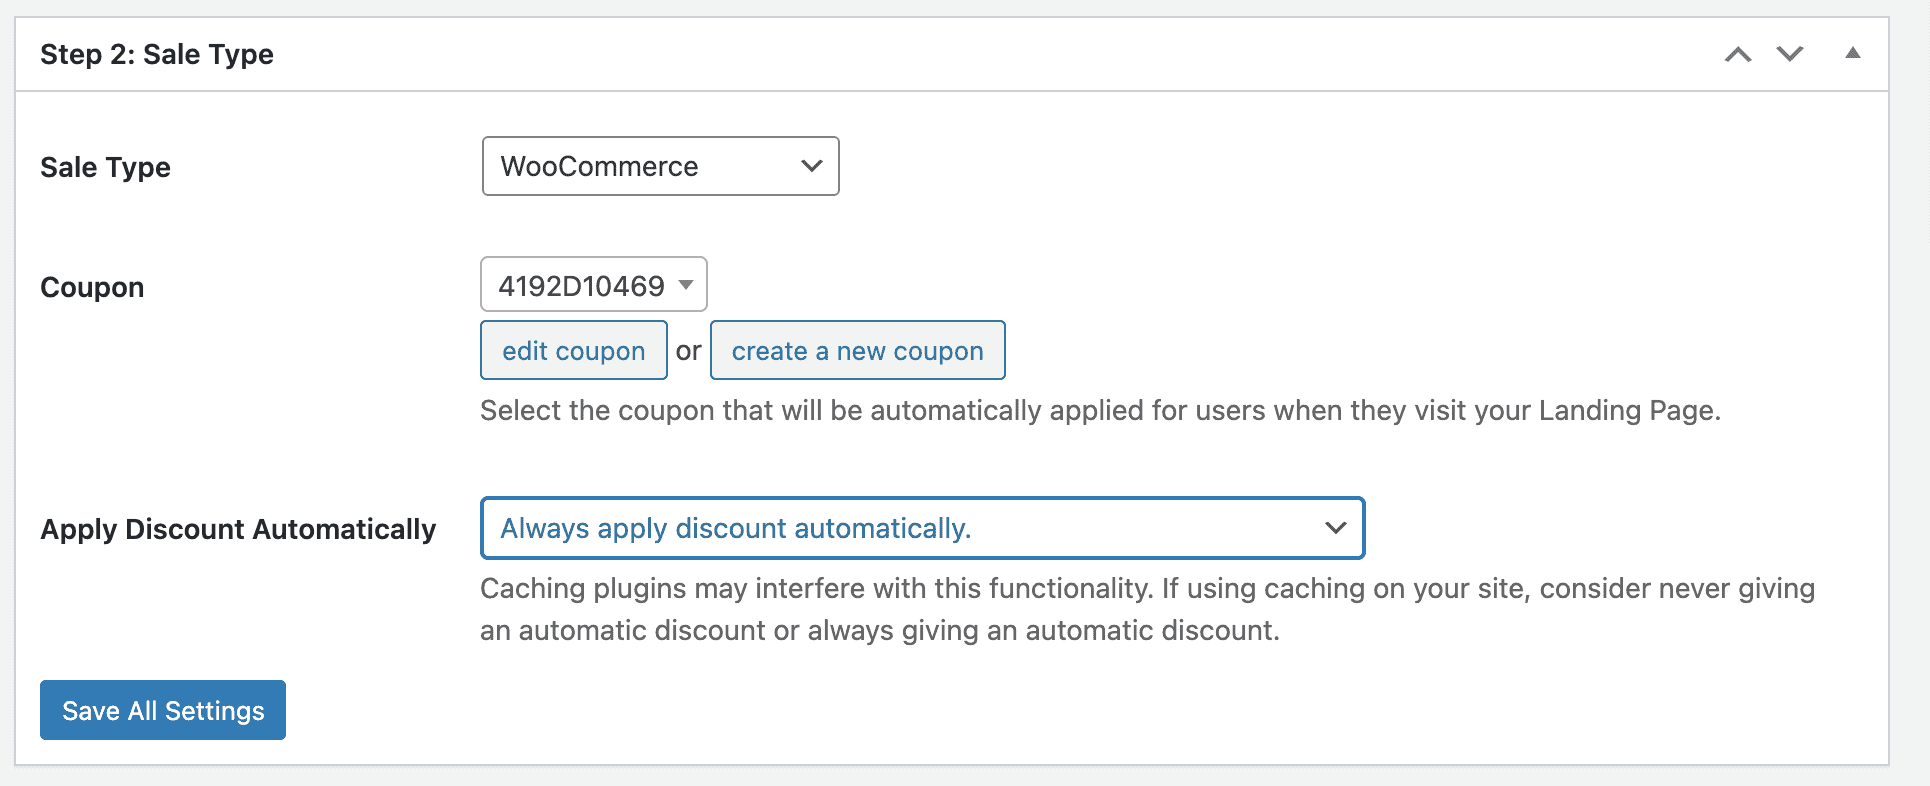
Step 2: Sale Type
- Sale Type: Here you will select “WooCommerce” for your option. Currently it also supports Paid Memberships Pro.
- Coupon: The coupon or discount code to apply to this sale. You may create a new coupon or edit a pre-existing one inside your WooCommerce settings.
- Apply Discount Automatically: For this example, we will choose “Always apply discount automatically“. Another great option here is to only apply the discount if the user views your landing page.
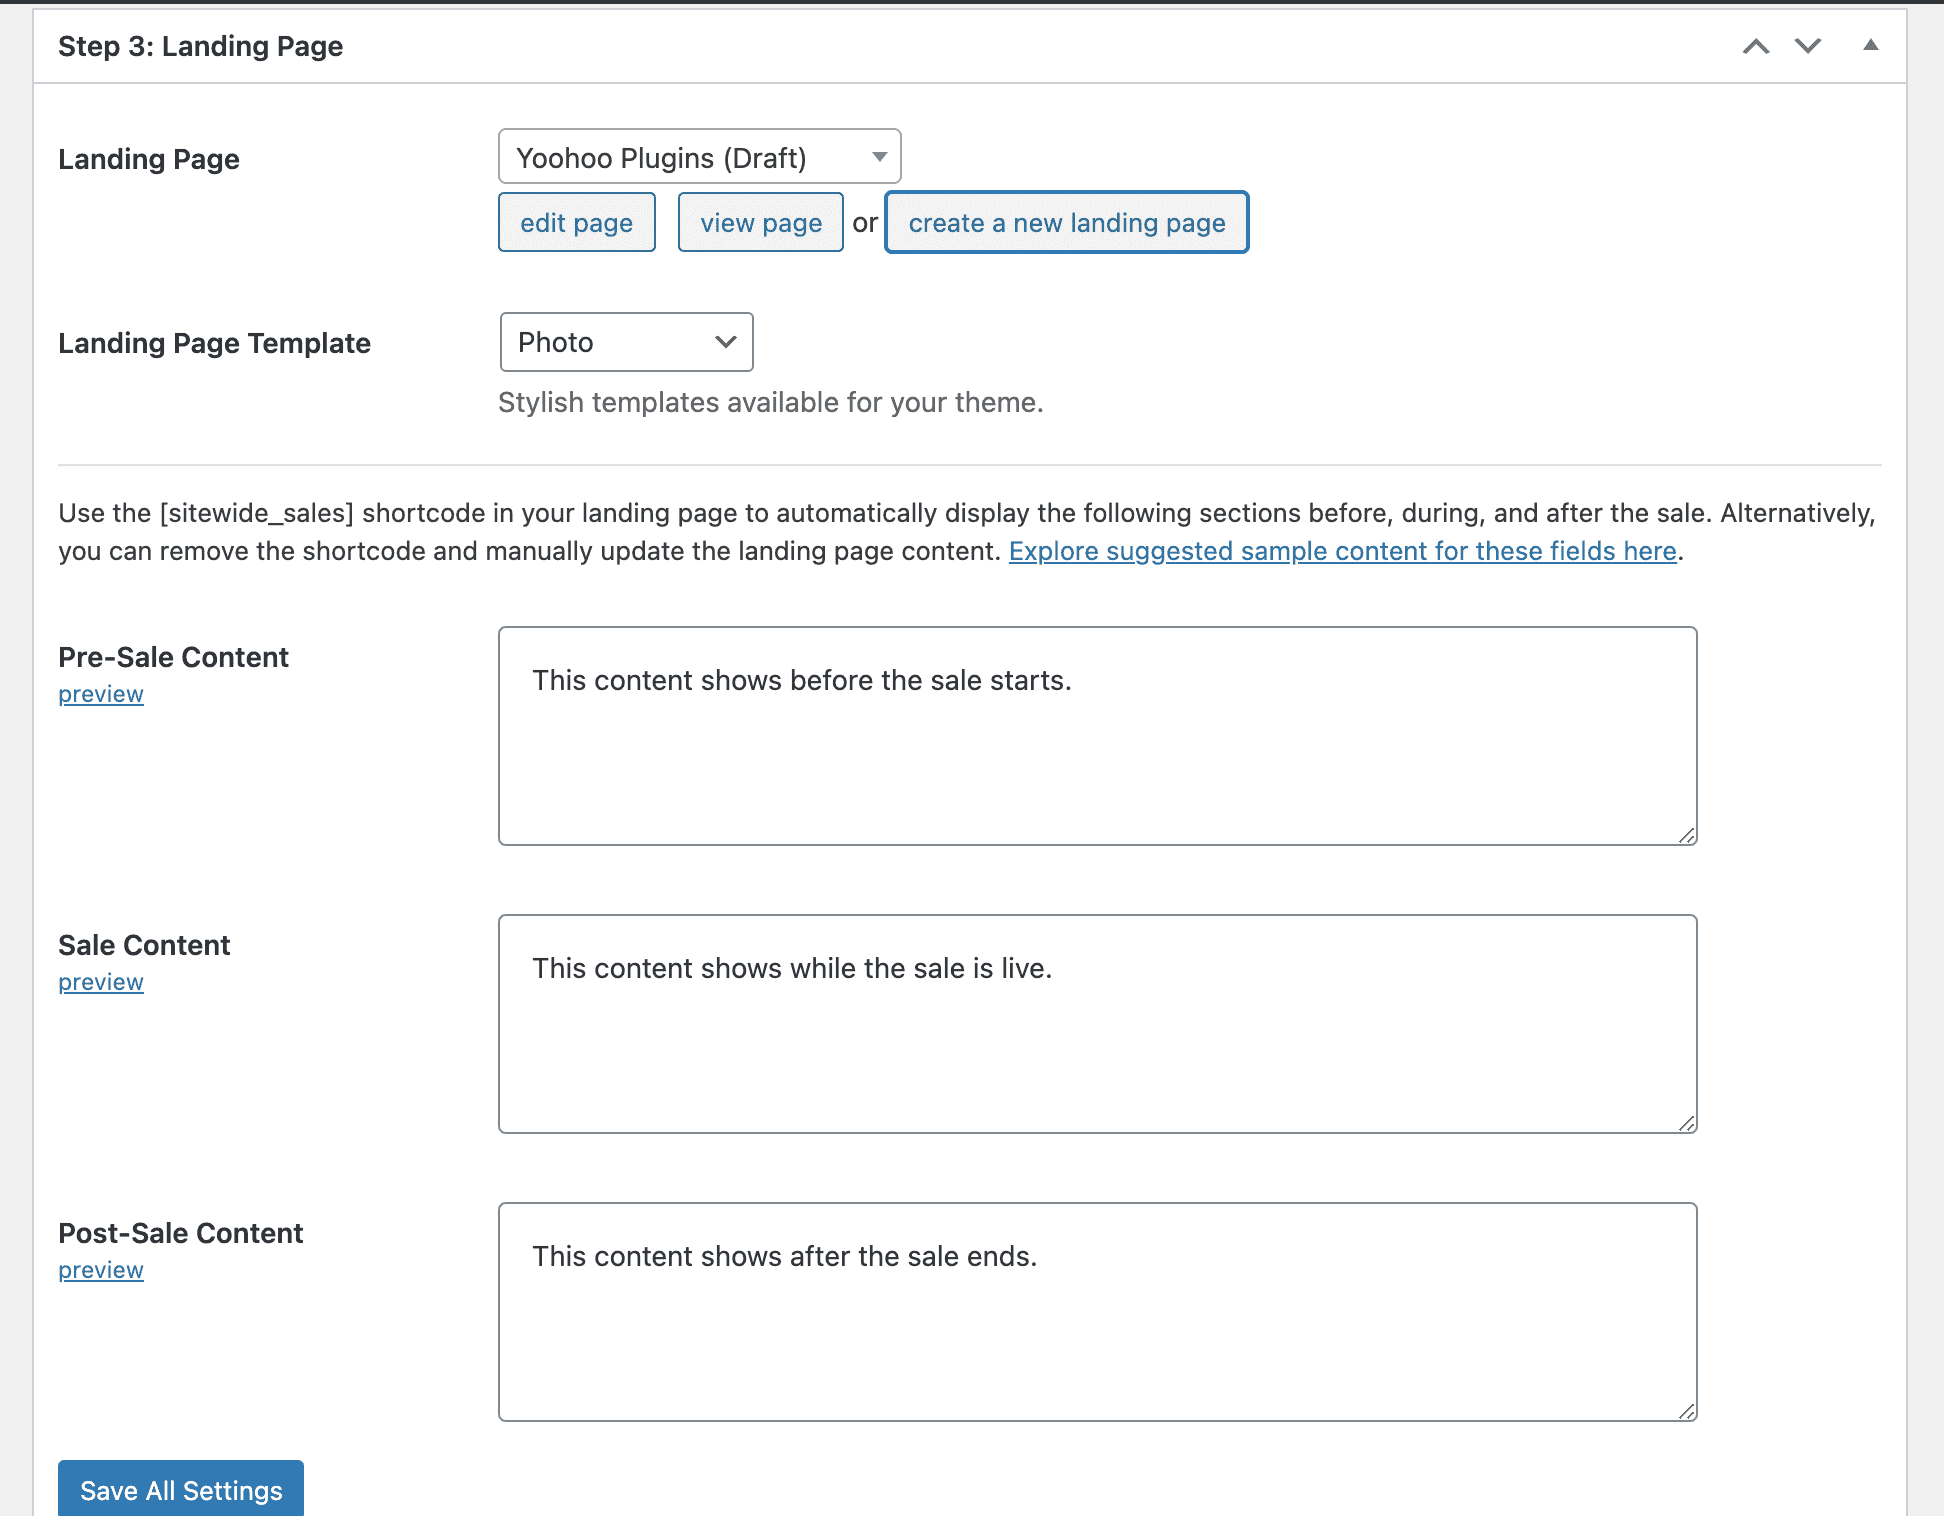
Step 3: Landing Page
- Landing Page: Here you will create a new page or select an existing WordPress page for your automated WooCommerce sale.
- Landing Page Template: The color scheme and general design of the landing page you would like to use. Leave this as “none” if you want to manually create the landing page design.
- Pre-sale Content: The content you’d like to show user’s if they stumble across your landing page. This is great to add a form or mailing list subscription feature.
- Sale Content: This shows a unique message while the sale is active. You can also edit the WordPress page to show general sale information.
- Post-sale Content: The content shown after the sale has ended. We add a discount code to our landing pages for any potential customer that may have missed our sale – see what we do with our Black Friday landing page.
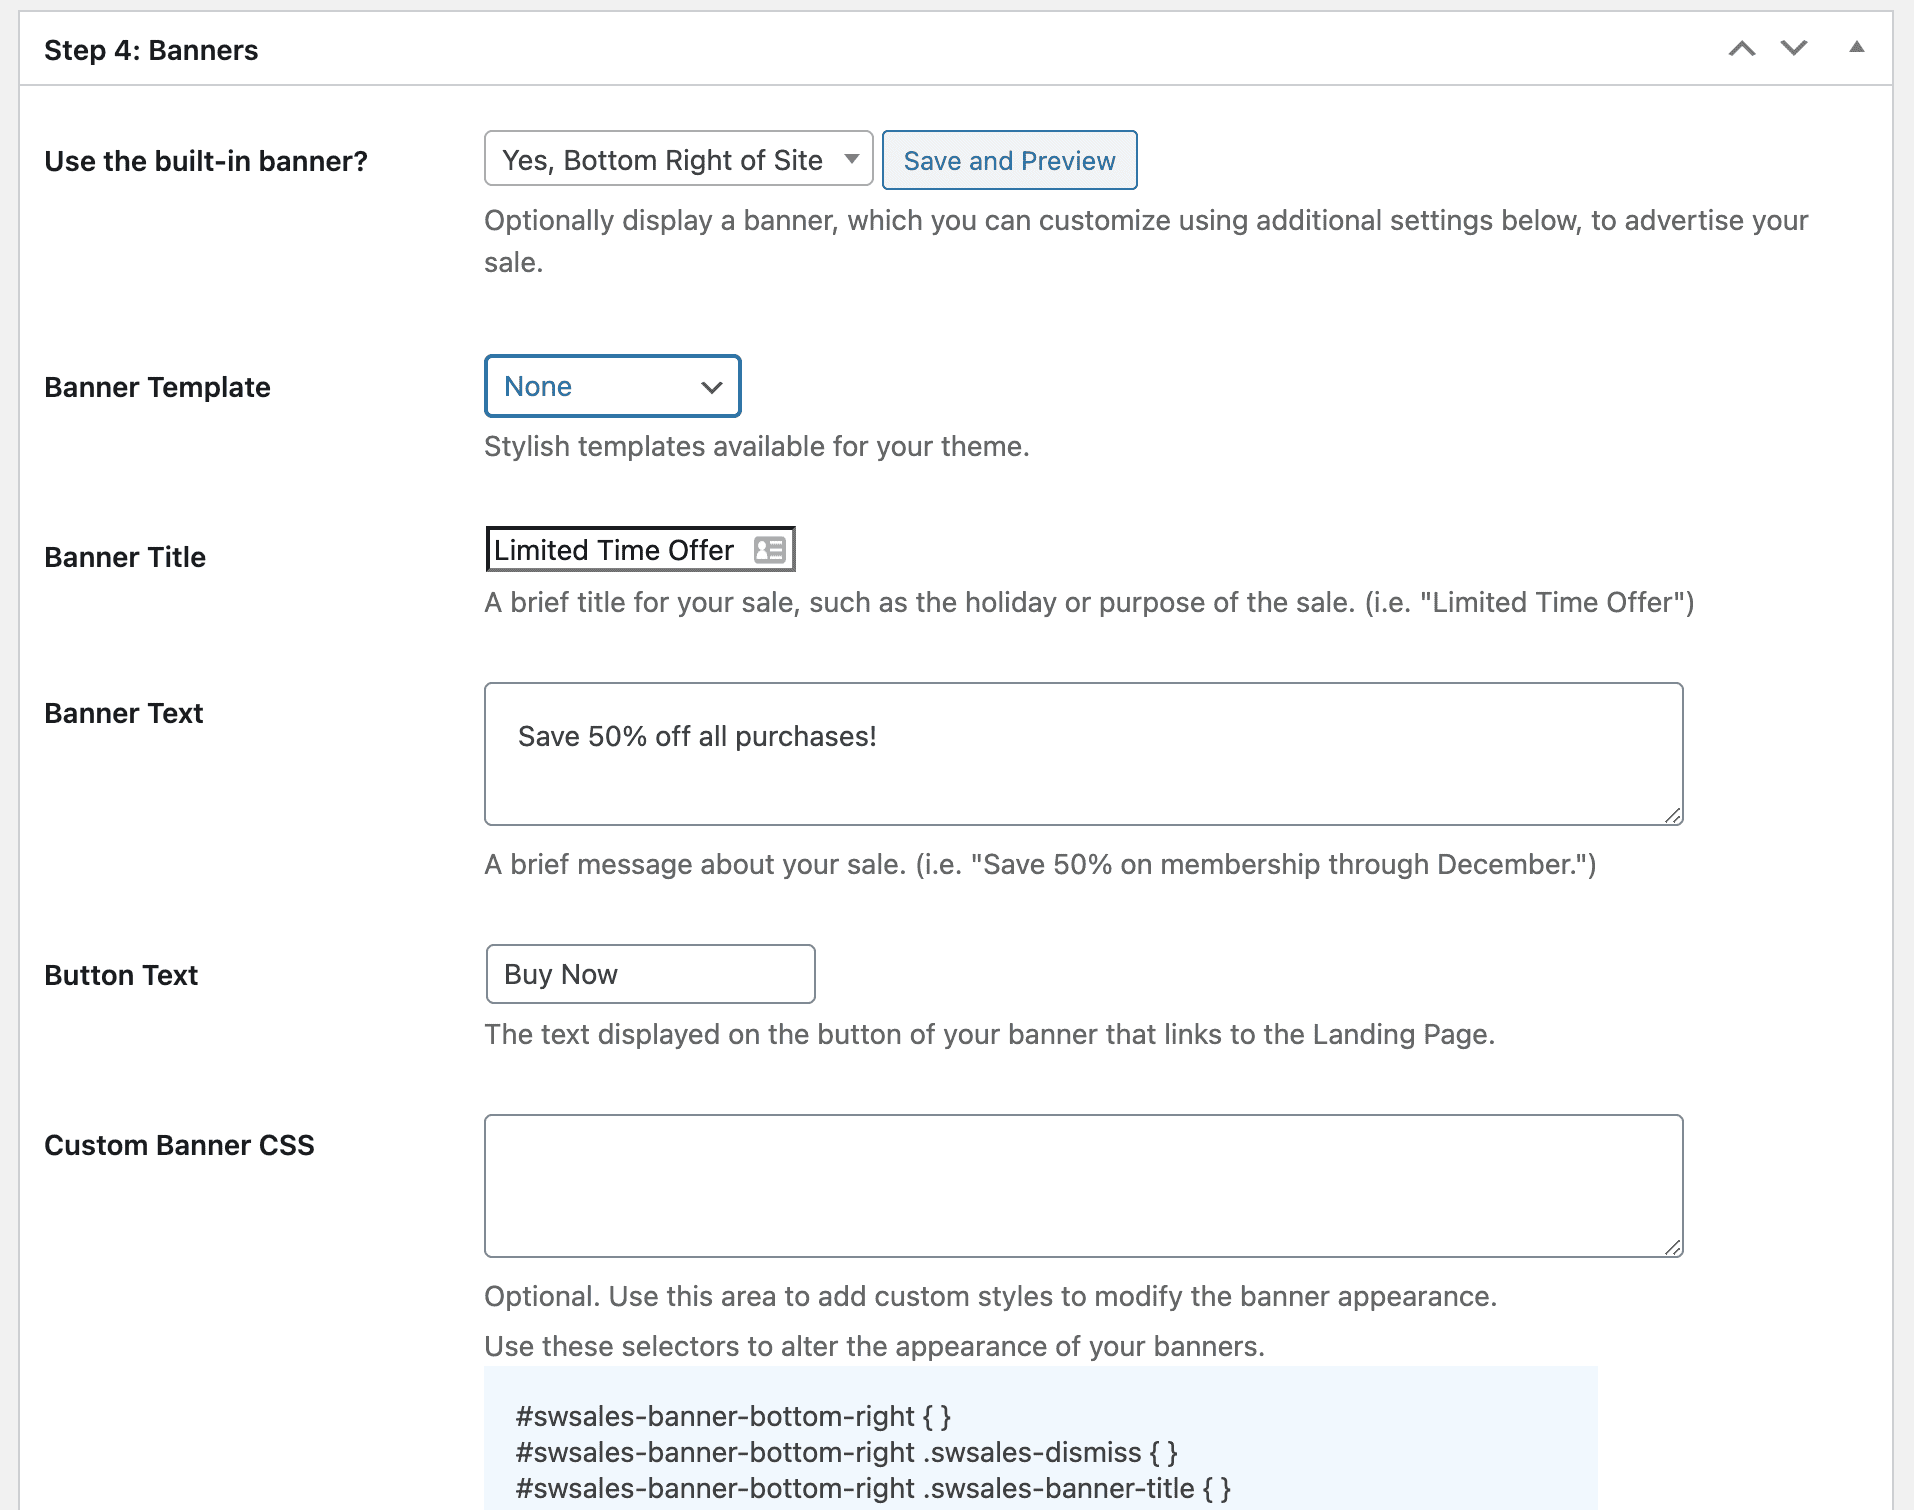
Step 4: Banners
- Use Built-in Banner: Choose this option if you want to use a prebuilt automated site banner. We like to use the option of “Yes, Bottom Right of Site“.
- Banner Template: Choose the predefined color styling of the banner, similar to the landing page template styling.
- Banner Title: The title of the banner.
- Banner Text: The text of the banner, such as “Save 25% off all purchases until 31 December 2021”.
- Button Text: The button text for the popup. Be sure to make it something catchy!
- Custom CSS: If you need to apply custom CSS to the banner only, it can be done here. (Or within your WordPress Customizer)
- Hide Banner at Checkout: Whether or not to show the popup banner during the checkout process.
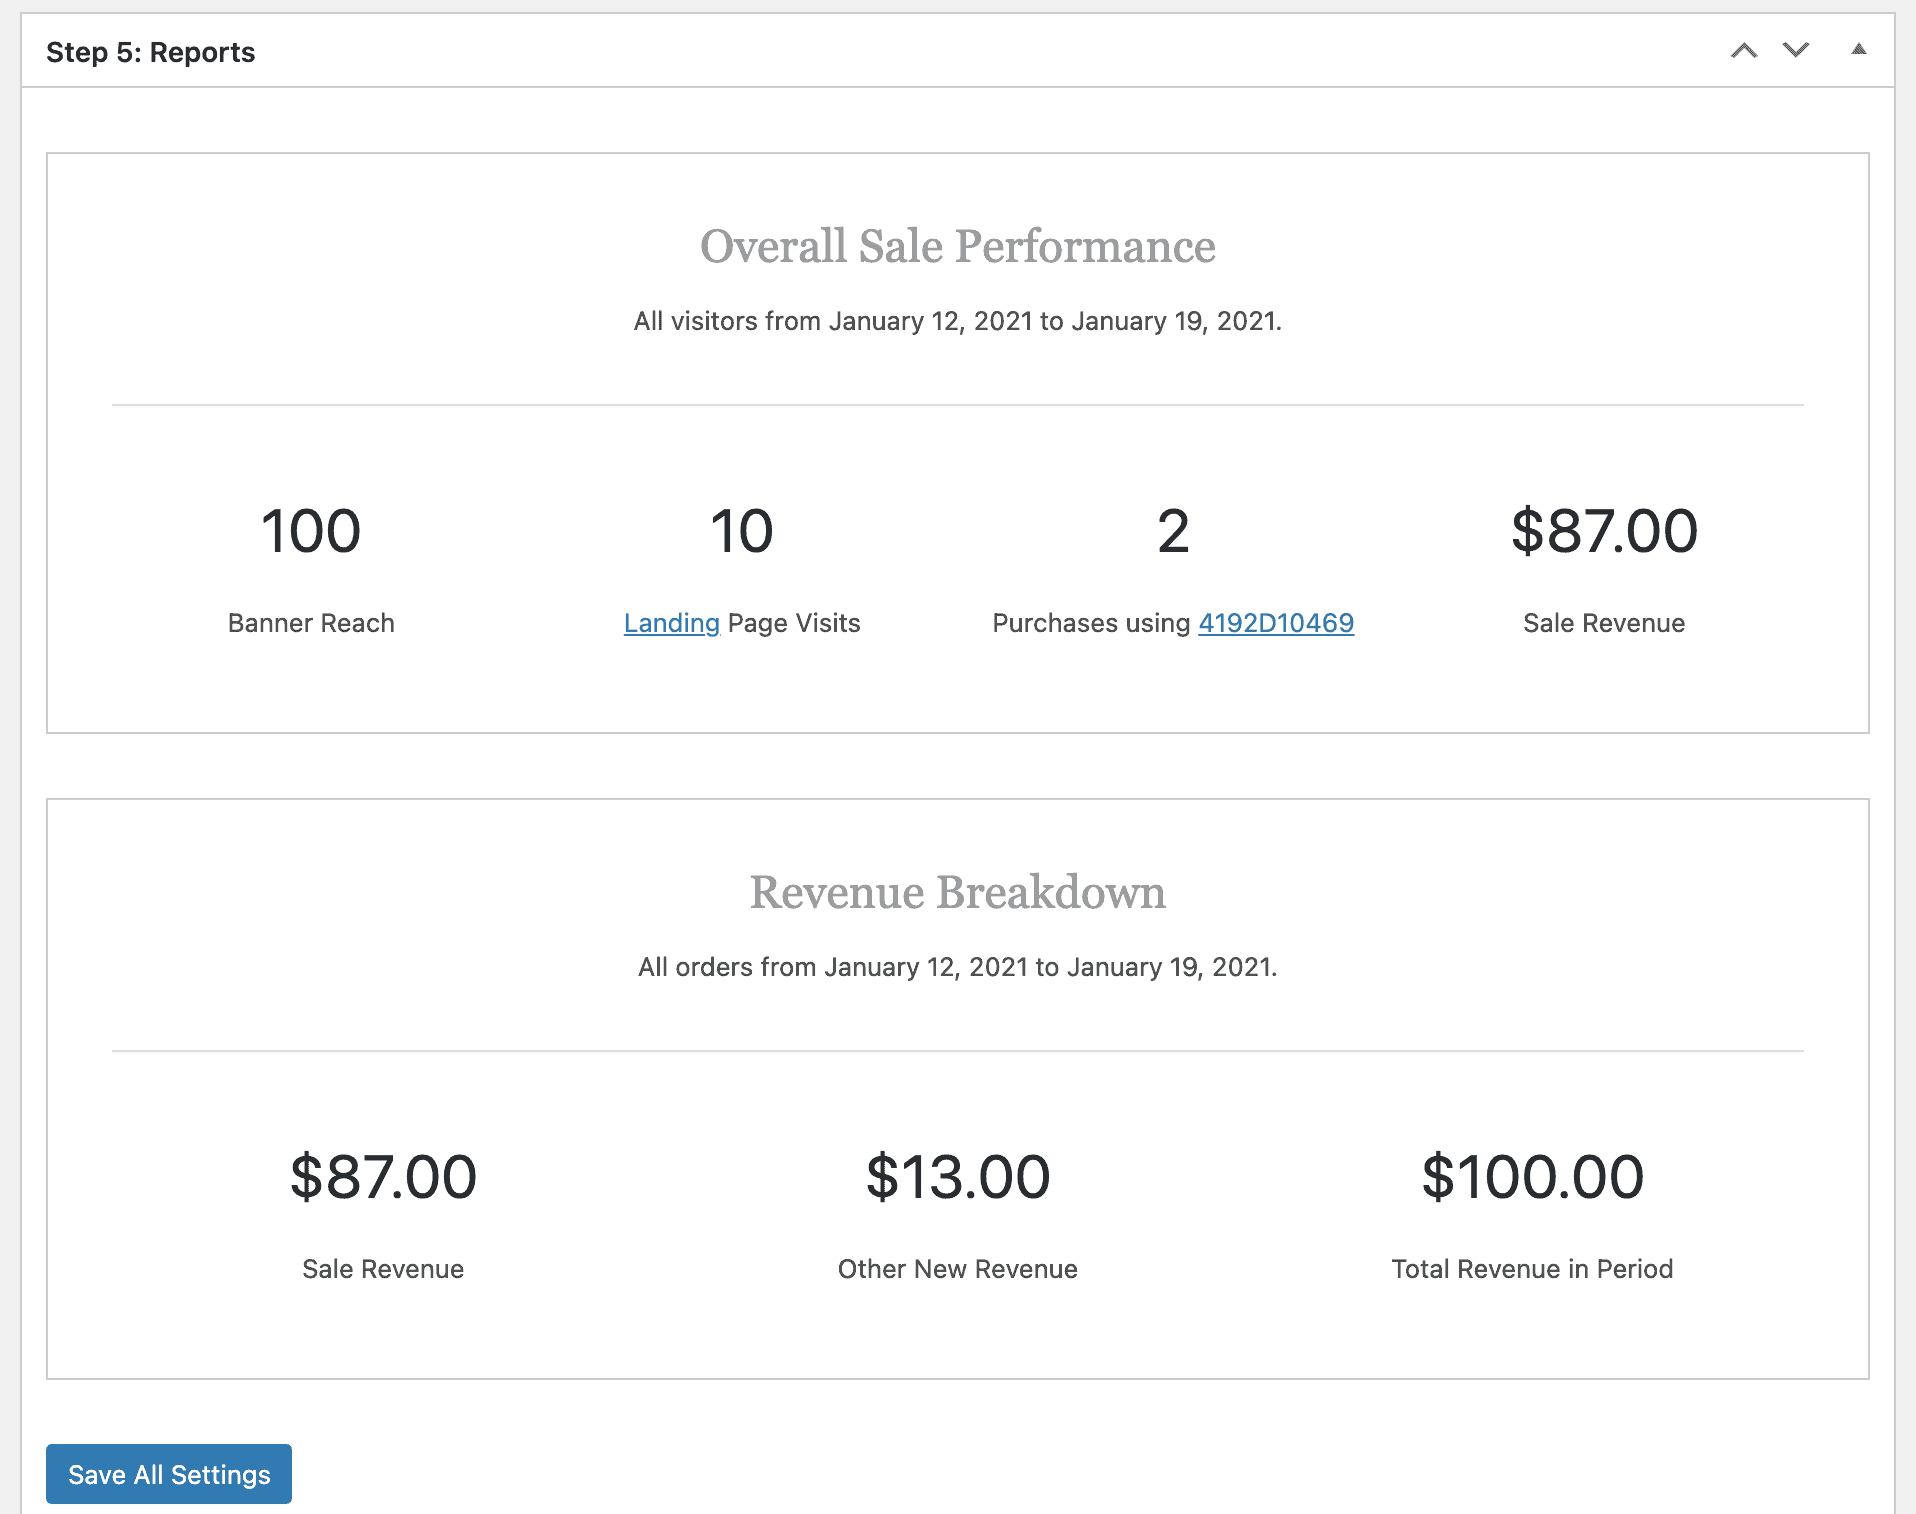
Step 5: Reports
Here you will get all your real-time statistics of how your sale went. You do not need to enter any settings in this area. The reporting includes the amount of revenue generated from this active sale (based off of the discount code) and any other sales that may have come in during this period.
Summary
As you can see by this article it’s rather easier to setup an automated sale for WooCommerce with the Sitewide Sales than a conventional method of manually creating pages, creating discount codes and promoting them. You can create unlimited sales and ‘queue’ them up for the year ahead and sit back and relax when these busy periods come around. We’re eagerly waiting for an Easy Digital Downloads integration from the Sitewide Sales team so we can start using this on our own site.
Be sure to checkout https://sitewidesales.com for examples and to grab yourself a copy so you can be ahead of the yearly sales rush. This article is not affiliated with Sitewide Sales whatsoever, if you have any questions please reach out to their support or pre-sales team.
Photo by Sorin Gheorghita on Unsplash
