
A WooCommerce cart lead time is the availability line from Lead Times for WooCommerce. Then the plugin stores that line on the cart item. It does this when a shopper adds the product. Also, cart, checkout, and the order email each have a switch. Those switches stay off until you tick them.
To begin with, set the product page. Read that setup in How to Show WooCommerce Lead Times on a Product before these steps. This article instead covers only the steps after Add to cart. It still does not replace the getting started guide.
We checked these steps on 19 November 2026. The check used the public product page and the getting started guide. It also used version 1.0.2 in the Yoohoo repository. This check still did not include a test order. So confirm the line on your own store before you trust it.
What you need
You need WooCommerce and Lead Times for WooCommerce. Then download the zip from the purchase email, or from File Downloads. Afterwards, go to Plugins, Add New, Upload Plugin. WordPress also explains that screen in the Plugins screen guide. After that, activate Lead Times for WooCommerce.
Price and requirements
On 19 November 2026 the product page lists one year of updates and support. One site costs $47. Five sites cost $97. Unlimited sites cost $147. The same page also offers a 14-day refund. It also says the plugin works with the new product editor. It also works with the legacy inventory tab and with HPOS. The page does not print a plugin version. It also skips a WordPress, PHP, or WooCommerce minimum.
We checked repository copy 1.0.2. The stable tag matches that number. The file asks for WordPress 6.1 or newer. It also asks for PHP 7.4 or newer. It also asks for WooCommerce 7.2 or newer. The file lists a WooCommerce test mark of 9.6.2. It also says it supports custom order tables. The 1.0.1 and 1.0.2 notes still leave the three switches in place. So a 1.0.0 copy still has Cart, Checkout, and Order details. If your zip header differs, follow the zip.
The licence key also sits on the same screen as the switches. Paste the key from your Yoohoo account, then save. Updates use that key.
Turn on cart, checkout, and order details
Open WooCommerce → Settings → Products → YH Lead times. The plugin spells that section “YH Lead times”. You can also open admin.php?page=wc-settings&tab=products§ion=yh-lead-times. The Plugins list has a Settings link to that same screen.
Under Display lead times on, tick the places you want:
- Cart shows the line on the cart page. A fresh install leaves this off.
- Checkout shows the line on the checkout page. This tick is separate. Cart does not turn it on.
- Order details saves the line on the order. The tip on that setting mentions email and the order page. A fresh install leaves this off too.
Shop/category pages and Brand pages are different switches. They do not add the line to the cart. Single product page starts on. That is the line from the earlier how-to.
Display lead times for picks which stock states can show a lead time. The choices are In stock products, Out of stock products, and Products on backorder. All three start on. If you clear a status, the plugin skips it everywhere, including the cart.
Then click Save changes.
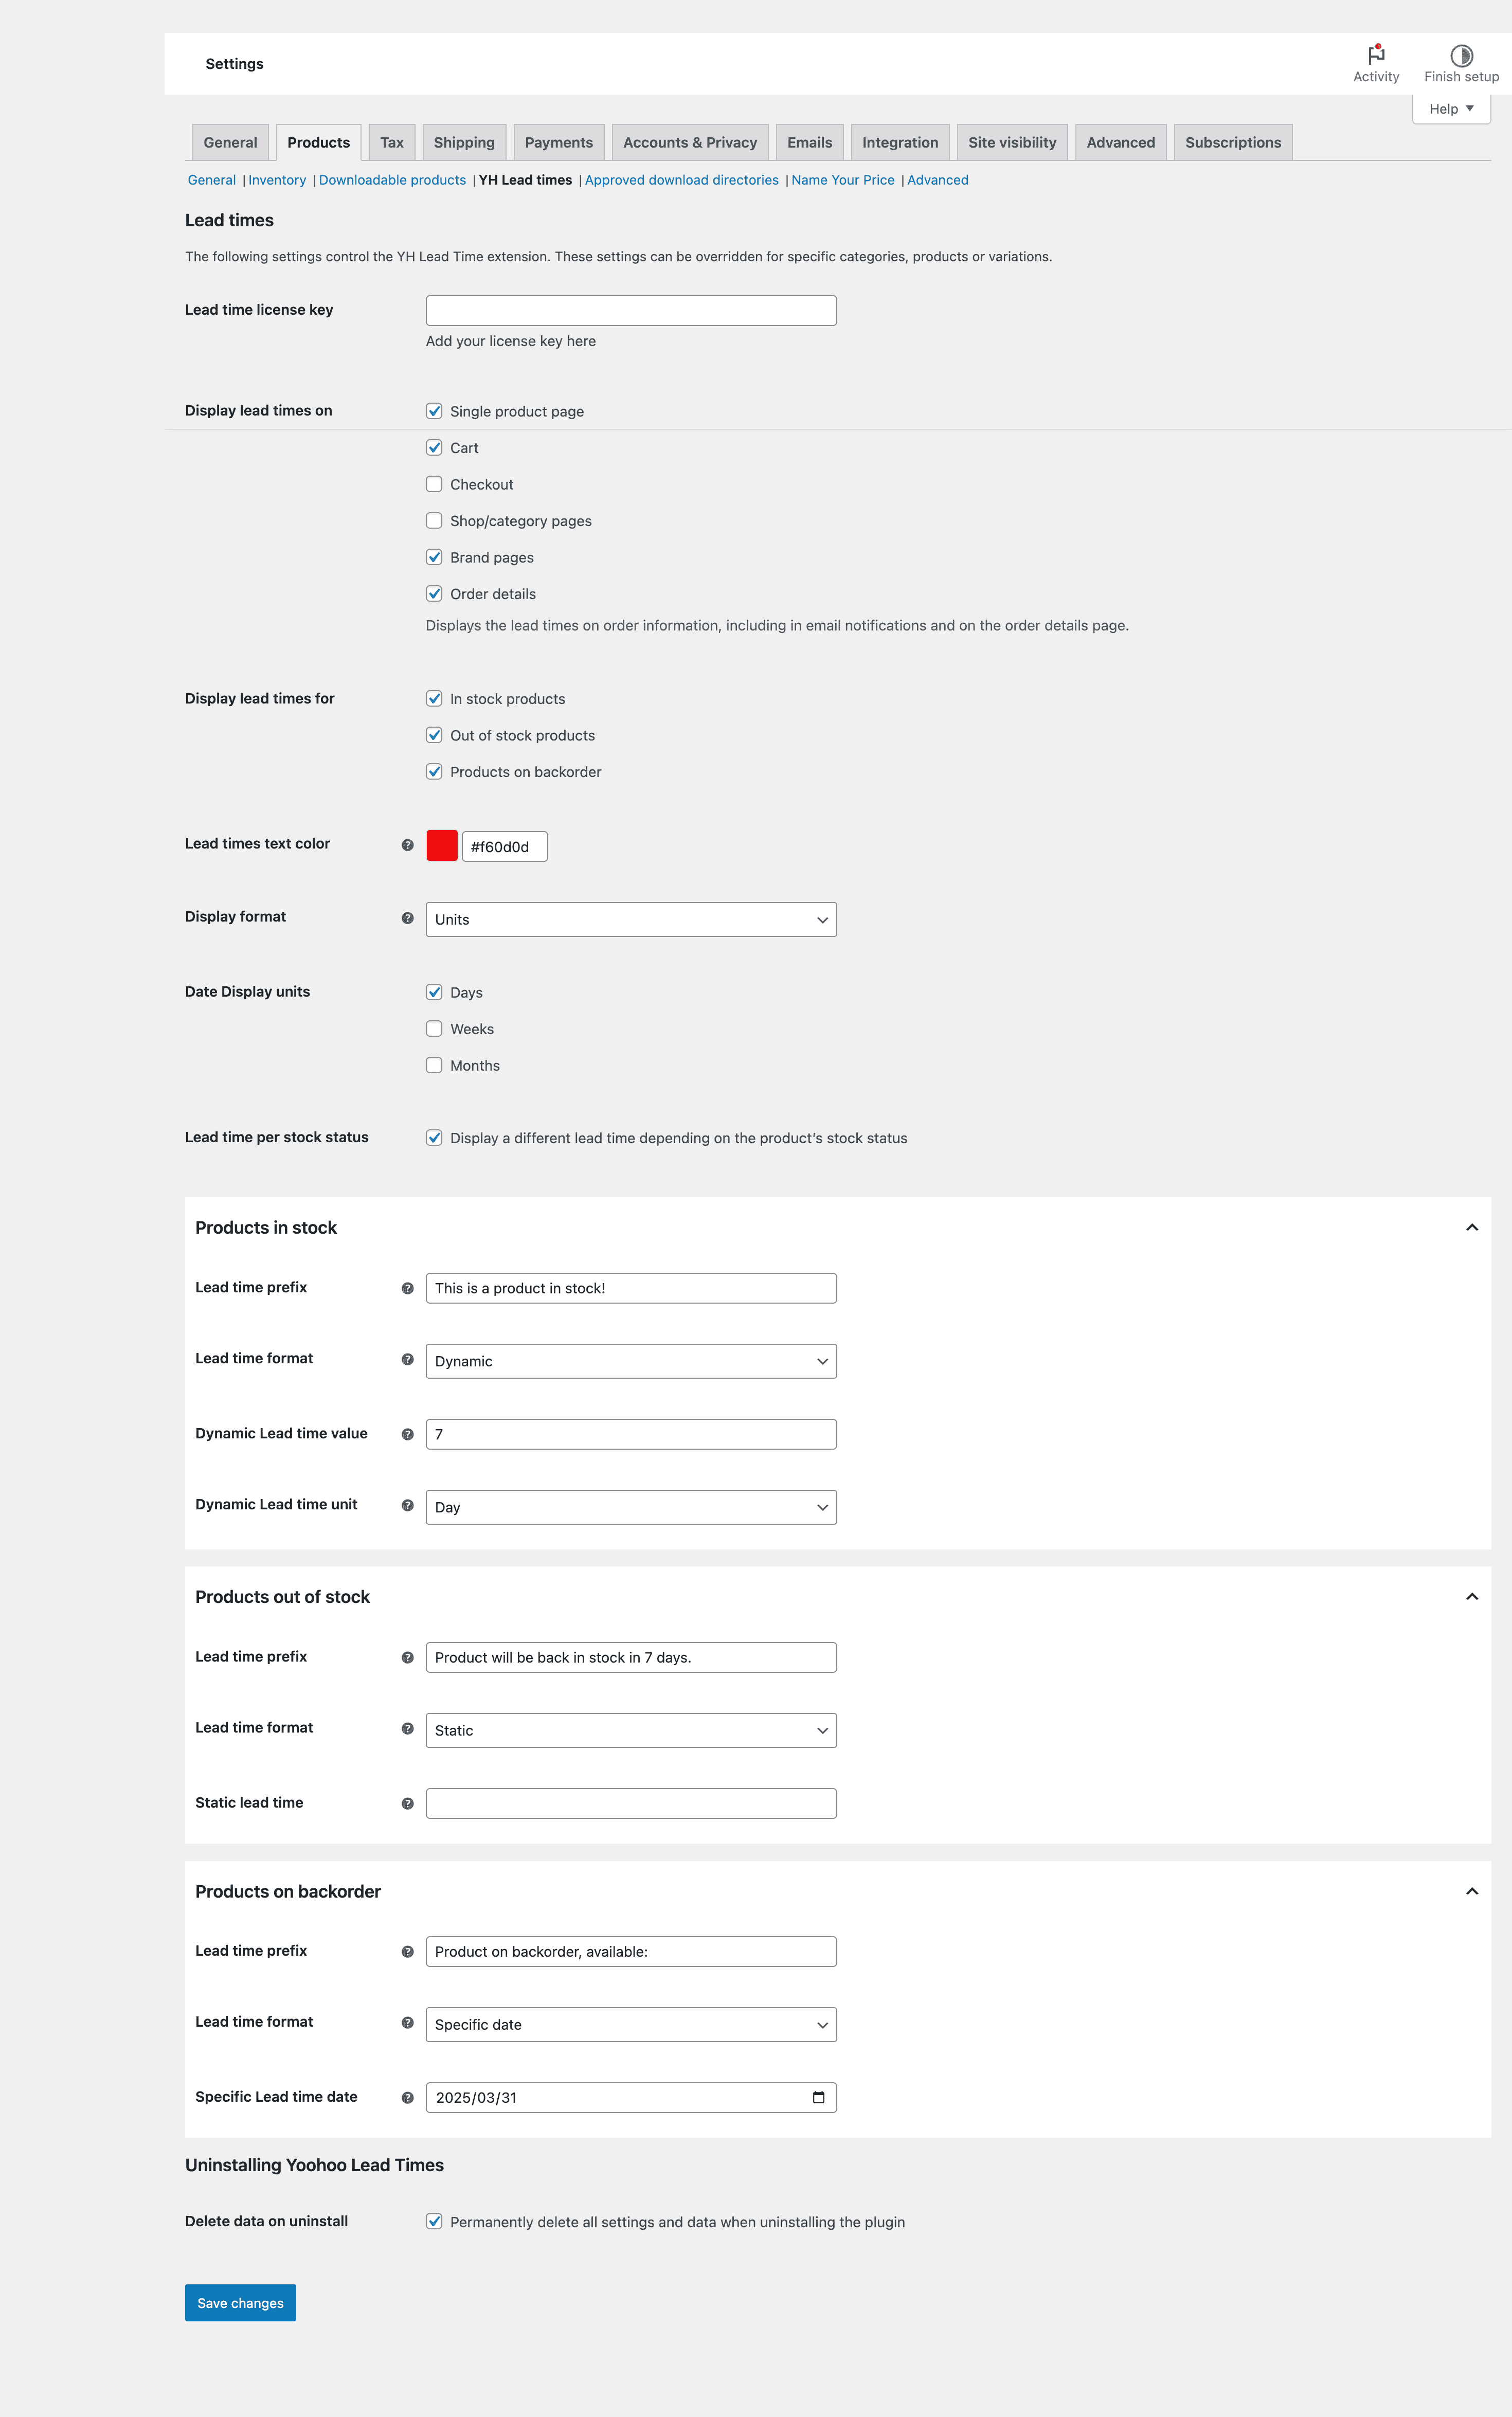
Read the sample screenshot
That picture is Media Library attachment 20890. It is the February 2025 capture from the getting started guide. Read it as a sample, not as a new install.
The sample ticks Cart. It also ticks Brand pages and Order details. Checkout is clear. Shop and category pages are clear as well. The text colour is #f60d0d. Lead time per stock status is on.
A new install is quieter. Only Single product page starts on. The default text colour is #333333. Per-stock lead times start off.
The picture also ticks Delete data on uninstall. Leave that box clear. Tick it only when you want the plugin to delete its settings on uninstall. The prefixes in the picture are examples. So is the date 2025/03/31.
What the cart line says
The plugin writes the lead time when the shopper clicks Add to cart. It does this for a simple product and for a variation. A virtual or downloadable product is still a simple product, so the plugin includes it. Grouped and external products do not get this cart line.
The cart keeps that wording. It does not build the line again when the shopper opens the cart. It also does not build the line again when the order email goes out. So a dynamic lead time can change on the product page the next day. The cart still shows the earlier words.
Set a prefix
Set Lead time prefix so the cart label is clear. The field’s own example is “Lead time:”. Use that prefix with the static text “Ships in 5 days”. The product page then shows one sentence. The cart splits it like this:
Lead time
Ships in 5 days
The plugin drops the colon from the label. If the prefix is empty, and the text has no colon, the label becomes Note. So put your words in the prefix field. Do not use the colour picker for the cart. That colour is only for the product page. The cart uses a normal item row, like a variation attribute.
Display lead times for still applies here. Clear Out of stock products, and an out-of-stock product gets no cart line.
Also, a later change does not rewrite items already in the cart. That includes a new lead time, or a Cart tick you add later. Remove the item and add it again.
Checkout is its own switch
Checkout reads the Checkout box, not the Cart box. You can show the line in the cart and hide it at checkout. Or you can do the opposite. Checkout still keeps the Add to cart wording, if the product had a lead time then.
A theme mini-cart shows the line only in two cases. The mini-cart must print WooCommerce item data, and the Cart switch must be on. A mini-cart that prints only the name and the price stays quiet. We did not click a Cart block or a Checkout block on 19 November 2026. So check the cart and checkout that your theme actually uses.
The order keeps the line
Order details runs when checkout creates the order. If that box is on, the plugin saves the cart wording on the line item. WooCommerce then prints those item details on the order screen. It also prints them in emails that list the products. The plugin does not send its own email.
Managing orders is the WooCommerce guide to the order screen. Email FAQ lists the messages WooCommerce sends. Open the email from your test order. If that email lists the products, the lead-time label should sit with the item. If an email skips line items, it will not show the label.
An old order does not gain the line later. If Order details was off at checkout, tick the box and place a new order. We did not test a hand-built order in wp-admin.
The order email keeps the Add to cart wording. It does not move a dynamic date forward on the morning it sends.
Check a test order
Use one simple in-stock product. Its product page should already show the lead time you want. Give it a prefix such as Lead time: and a short static sentence you can spot. Save the product. Then open YH Lead times and tick Cart and Order details. Also tick Checkout if the checkout page should show the line. Save again.
Add that product to the cart. The cart item should show the prefix as the label, and the rest as the value. Then place a test order the way WooCommerce describes in Testing orders. Open the order in wp-admin, and open the customer email. Both should show the same label and the same words you saw in the cart.
If you use a dynamic lead time, wait until the next day. Then compare the product page with the order you already placed. The product page may move. The order should still show the earlier line.
When the line is missing
First, check the switch for the screen you are on. Cart, Checkout, and Order details do not turn each other on.
Then check the product.
- Keep the right stock status ticked under Display lead times for.
- The product is simple, or it is a variation. Grouped and external products do not get this cart line.
- The lead time has text, a date, or a dynamic value. The plugin does not store an empty line.
- The shopper added the item after that lead time existed. An older cart item stays as it was.
- You are on the shop grid. That grid uses Shop/category pages, which is a different box.
The text colour will not tell you if the cart works. The shop grid will not either. Read the cart page, then the order.
If the product page has no lead time, stop here. Go back to How to Show WooCommerce Lead Times on a Product before you change these switches.
Conclusion
Tick Cart, Checkout, and Order details only where you want the line. Set a prefix so the cart label is yours, not the word Note. The cart and the order email keep a copy from Add to cart. They do not calculate the line again.
The full setting list stays in the getting started guide. The product is Lead Times for WooCommerce. If a licence key fails, or a new order drops the line, open a ticket on the support page.