
Creating a demo website is an excellent way to showcase your products, services, or features to potential customers. Whether you’re promoting a plugin, a product, or a concept, a well-built demo site can demonstrate functionality, build trust, and drive engagement—all without requiring a hefty budget. In this guide, I’ll walk you through the process of building a professional demo website using free tools and custom code in WordPress. Drawing from my experience creating a demo site like demo.yoohooplugins.com, I’ll share a step-by-step approach that’s adaptable to any project, proving that you can achieve impressive results with minimal cost.
Follow these 6 simple steps, and you’ll have a stunning demo site up and running in no time!
Step 1: Choosing the Right Tools
The foundation of your demo site starts with selecting the right free tools. Here’s what works and why:
Why WordPress?
WordPress is a free, open-source platform that powers over 40% of the web. Its flexibility, vast ecosystem of plugins, and ease of use make it ideal for building demo sites.
According to W3Techs, with a 43.5% market share across all websites and 61.3% among CMS users as of April 2025, its flexibility, vast plugin ecosystem, and ease of use make it ideal for demo sites, eCommerce, portfolios, or feature showcases. Statistics from Themeisle and Mobiloud highlight its dominance, powering over 35 million websites and a quarter of all eCommerce sites via WooCommerce. This widespread adoption ensures a reliable, community-supported platform for your demo.
Whether you need a simple showcase or an eCommerce demo, WordPress adapts to your needs. For sites requiring online store features, it integrates seamlessly with WooCommerce.
Picking a Free Theme
Selecting a free theme is crucial for a lightweight, customizable base. Hello Elementor, designed for Elementor, offers a clean slate with fast load times, ideal for performance-focused demos. Alternatives include Astra, known for speed and flexibility; Neve, customizable for various niches; and GeneratePress, praised for simplicity. Explore more options in the WordPress Theme Directory, or check curated lists like Elementor’s best free themes and WPForms’ recommendations.
Tip: Choose themes with recent updates and active support forums for compatibility with the latest WordPress versions.
Using Elementor Free
Elementor Free is a drag-and-drop page builder offering over 32 widgets, including Image, Heading, Text Editor, Button, and more, as detailed on Elementor.io. It includes a template library for pre-designed sections, advanced design tools like shape dividers and box shadows, and pixel-perfect control, as noted by Crocoblock. For beginners, its no-code interface is ideal, with features like mobile editing and responsive design, ensuring your demo looks great on all devices.
Trick: Use the HTML widget for advanced functionality, like inserting shortcodes, to extend beyond free limitations.
Step 2: Setting Up the Site Structure
Your site’s structure should reflect your demo’s purpose. For eCommerce demos, install WooCommerce, which manages products, carts, and checkouts, essential for showcasing features like pricing or delivery estimates. For non-eCommerce demos, focus on creating pages for features, portfolios, or services. Plan your navigation with clear menus, using tools like the Custom Menu Shortcode for flexibility.
For example:
- A contact or call-to-action page, if relevant.
- A homepage to introduce your demo.
- Individual pages for specific features, products, or services.
Tip: Sketch your site map first to ensure logical flow, enhancing user experience.
Step 3: Designing the Demo Pages with Elementor Free
Elementor Free simplifies page design with its intuitive interface. Create a new page, add sections with columns for side-by-side displays, and populate with widgets. For example, use Image for visuals, Heading for titles, and Text Editor for descriptions
Tip: Use pre-designed templates from Elementor’s library to save time, then customize with your content.
Trick: If widgets lack specific features, use the HTML widget to insert custom code or shortcodes, like for photo displays or [add_to_cart] for product interactions.
Overcoming Limitations
Elementor Free lacks advanced widgets like Theme Builder or dynamic content, but workarounds include custom CSS and shortcodes. For instance, hide default page titles in Page Settings to use custom headings, ensuring a clean design.
SEO Tip: Use descriptive alt text for images and structure content with H1, H2 headings for better search rankings.
Step 4: Adding Custom Functionality with Shortcodes
Shortcodes are small code snippets that add dynamic content to your pages, bridging gaps in Elementor Free’s capabilities. They’re useful for embedding galleries, forms, or custom layouts without coding.
Using Existing Shortcodes
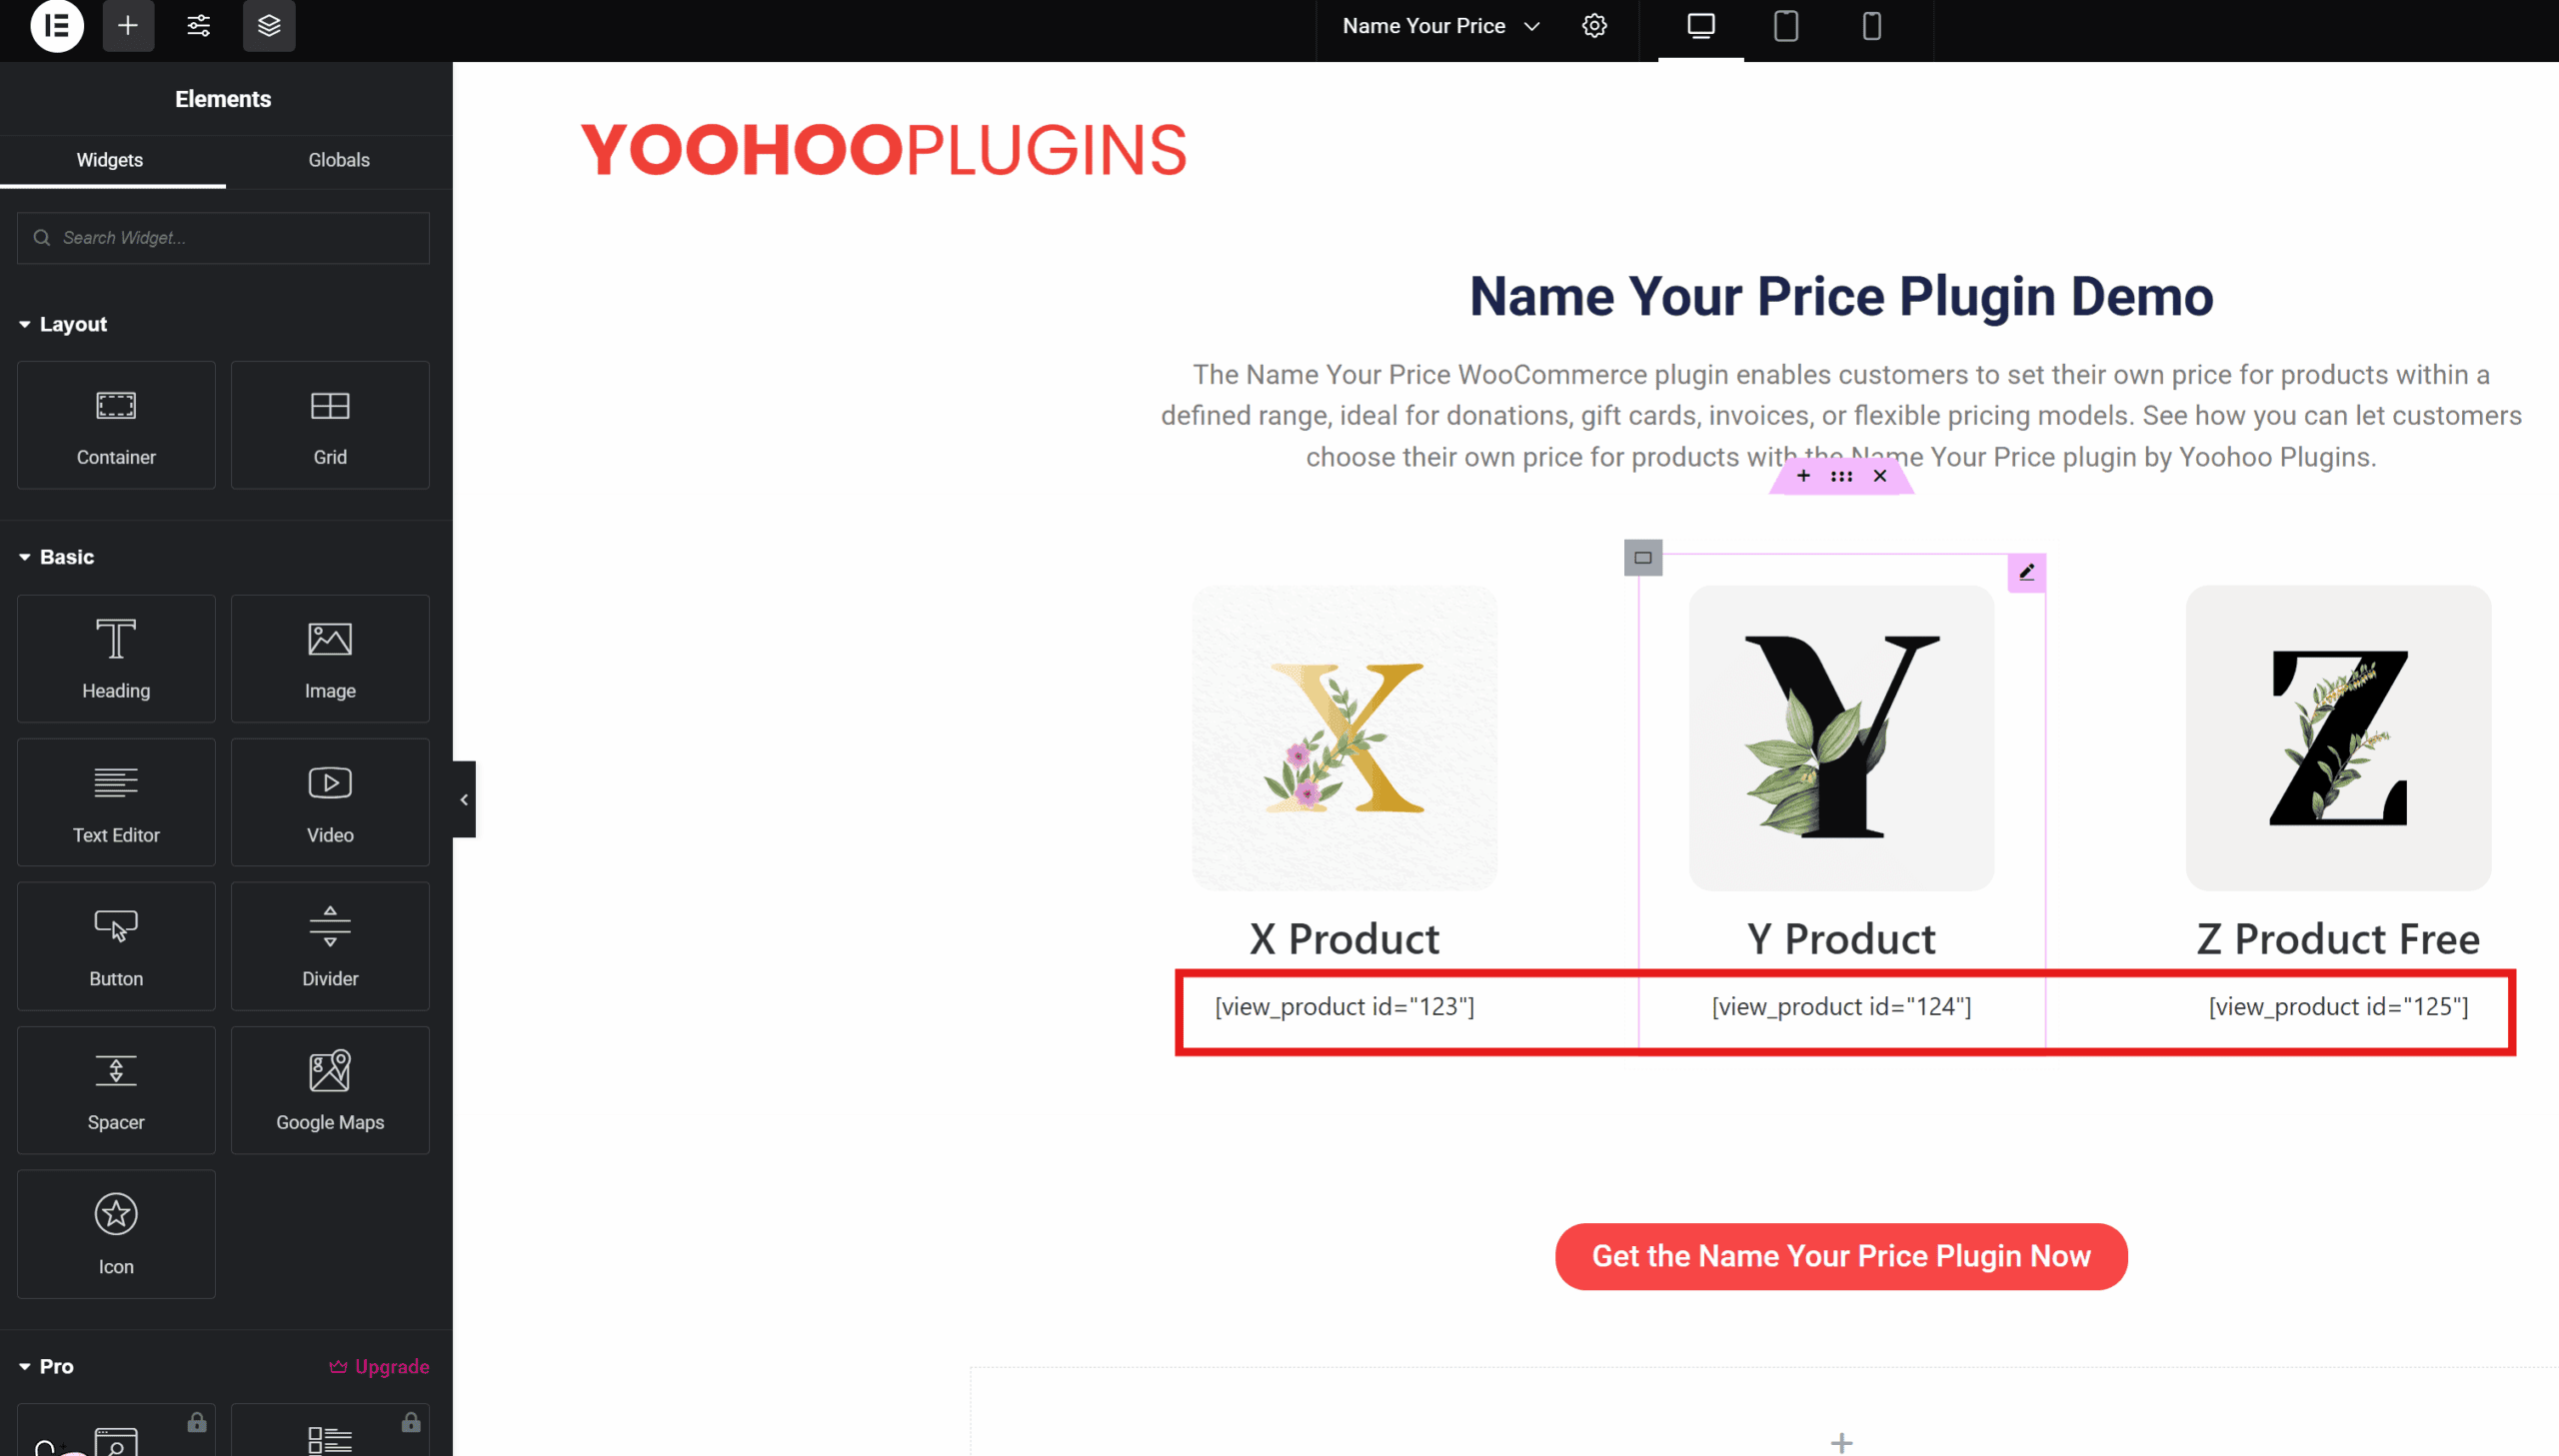
WordPress and plugins like WooCommerce provide built-in shortcodes, such as for photo displays or [add_to_cart id=”123″] for product interactions. Insert these into Elementor’s HTML widget to enhance your demo.
Tip: Test shortcodes in different contexts (posts, pages, widgets) to ensure compatibility, as some may not work everywhere.
Creating Custom Shortcodes
For advanced functionality, use the Code Snippets plugin to add custom PHP code safely.
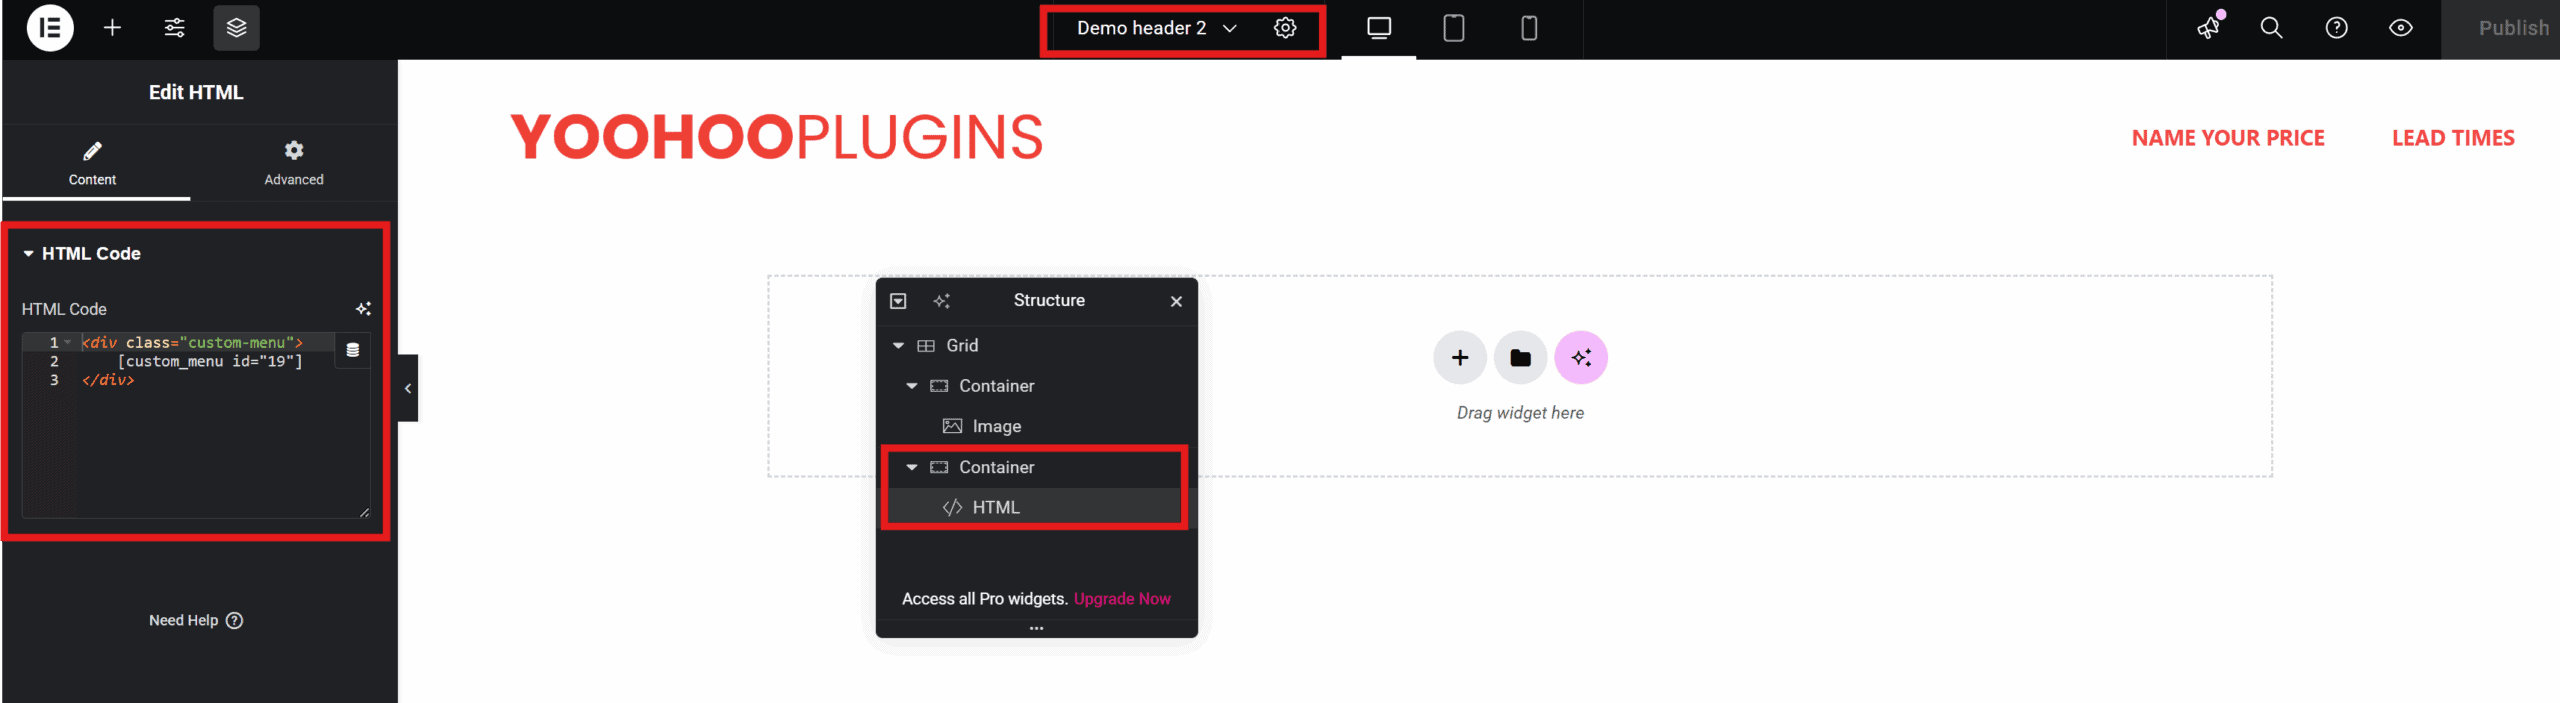
Example 1: Display a custom menu with:
function display_custom_menu($atts) {
    $atts = shortcode_atts(array('id' => ''), $atts);
    ob_start();
    wp_nav_menu(array('menu' => $atts['id']));
    return ob_get_clean();
}
add_shortcode('custom_menu', 'display_custom_menu');
To check the ID of your menu in WordPress, follow these steps:
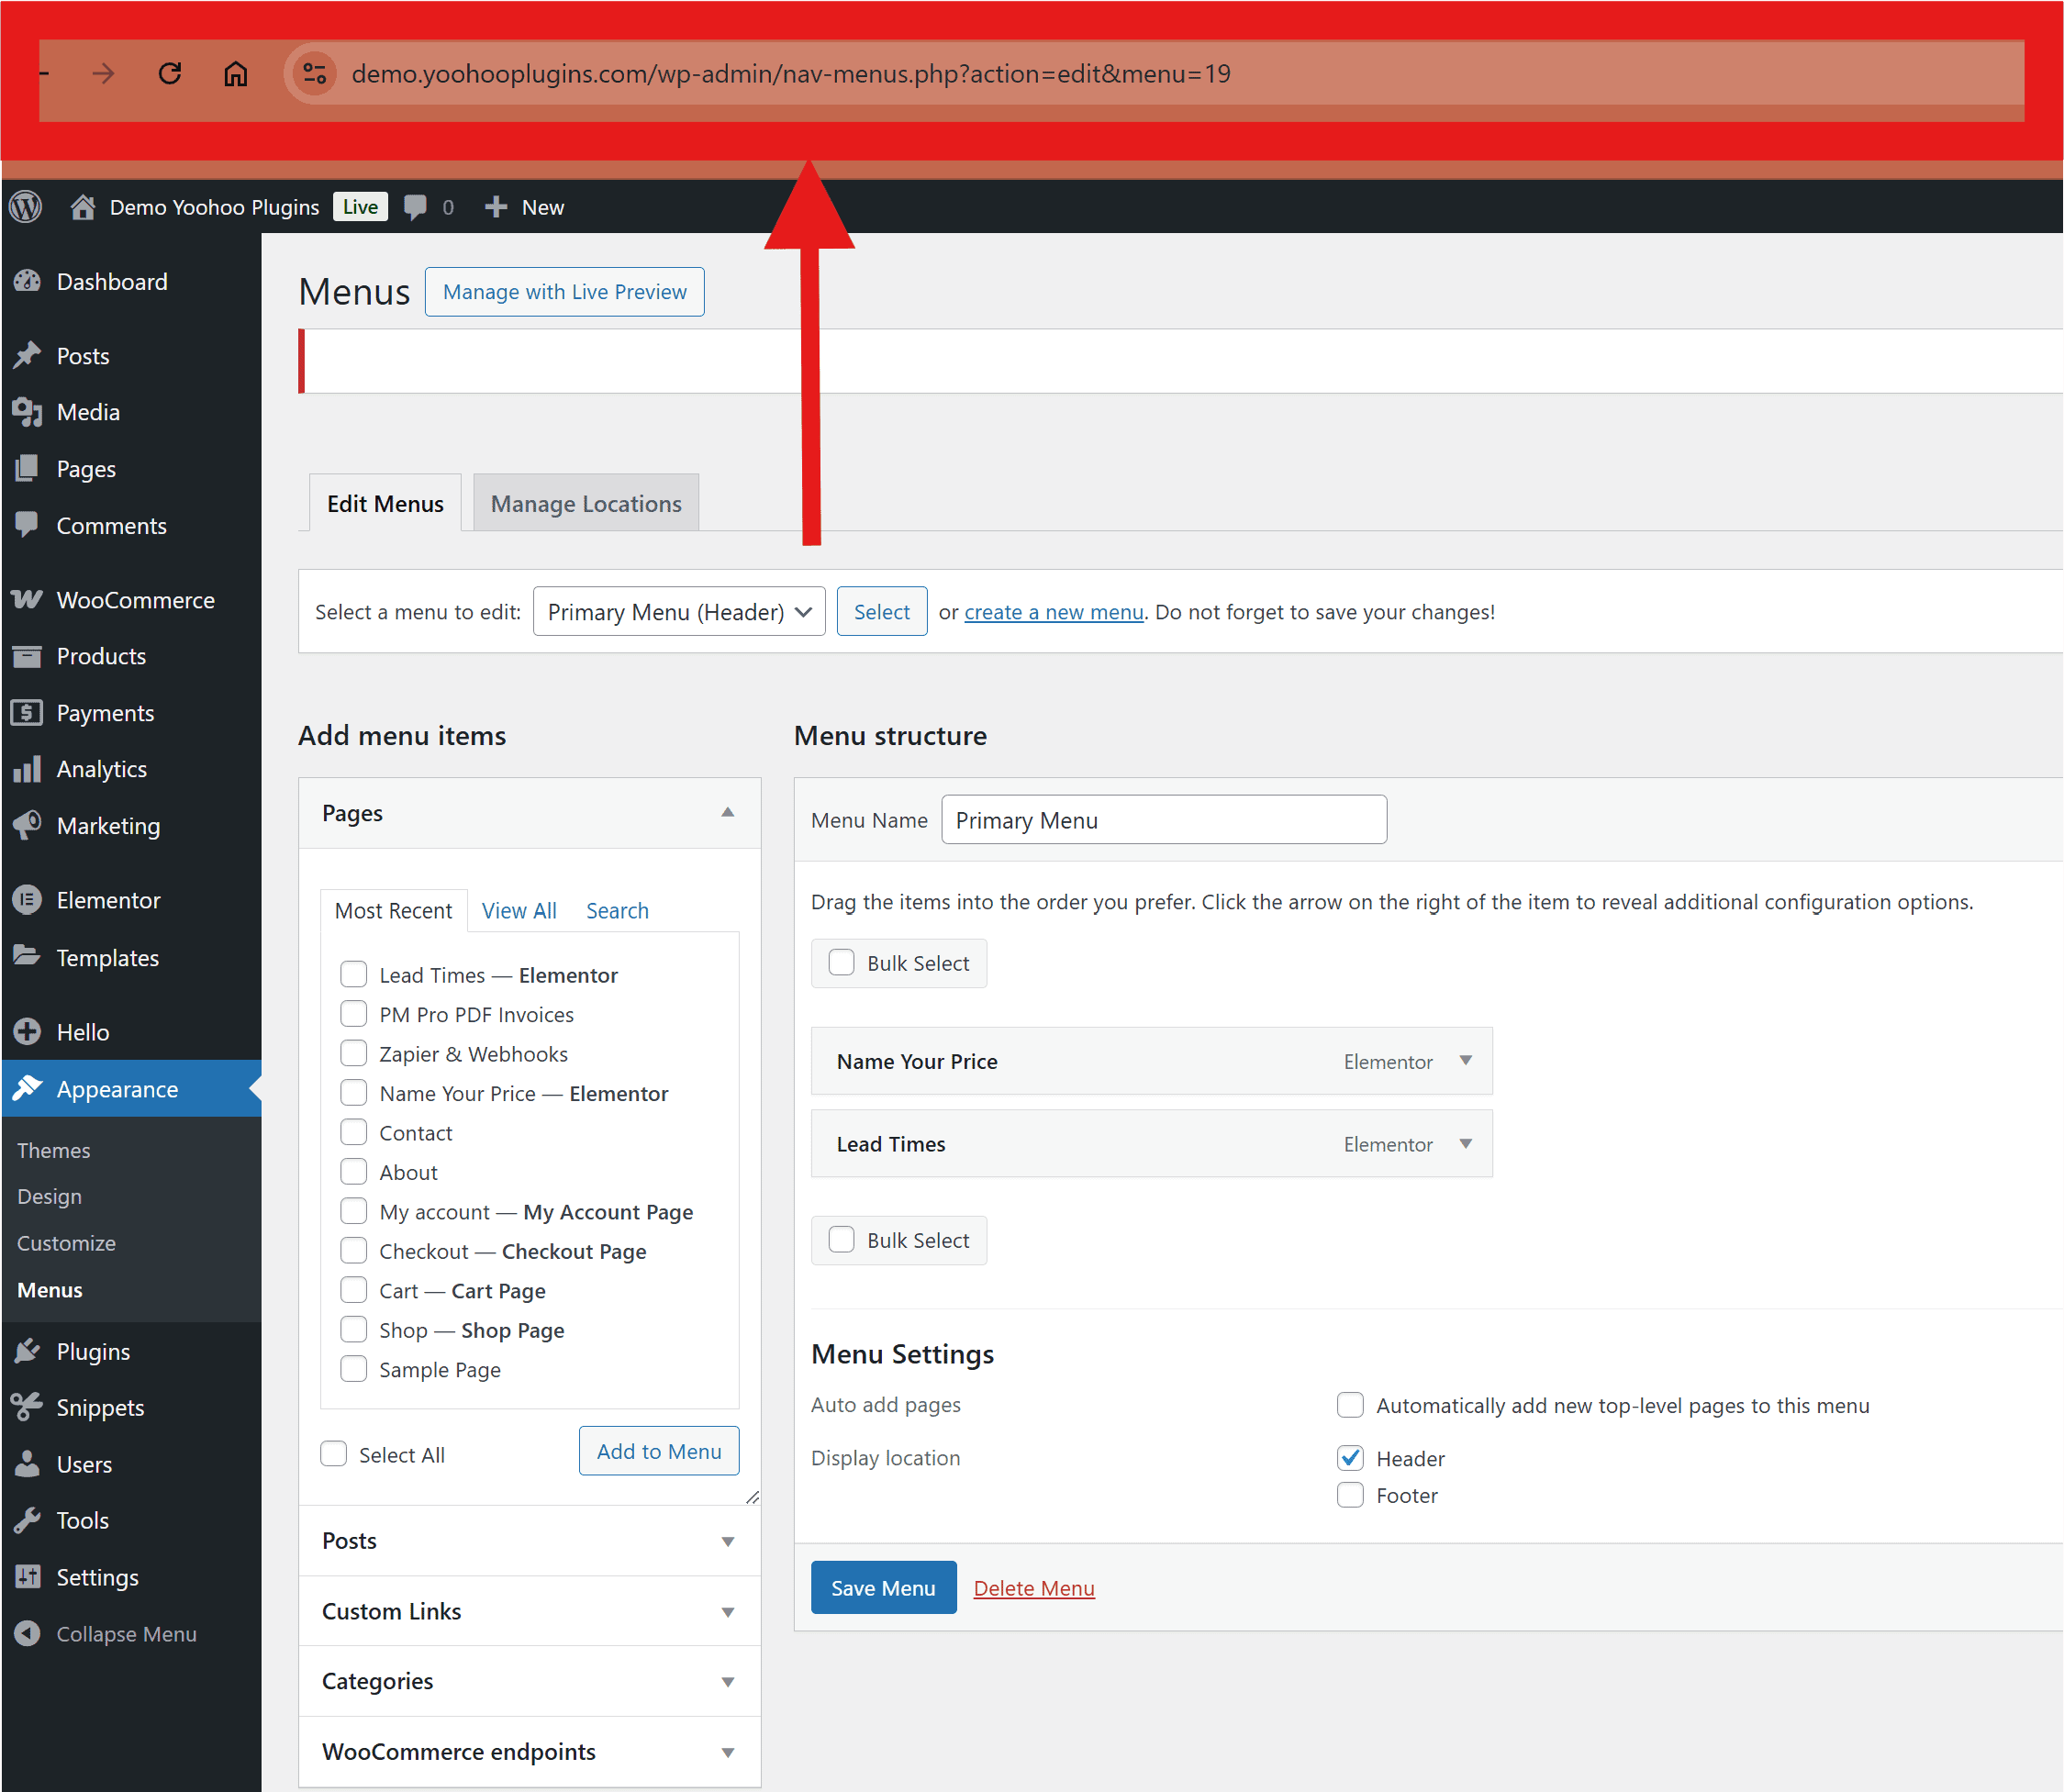
- From your WordPress dashboard, go to Appearance > Menus.
- Select the menu you want to find the ID for.
- Look at the URL in your browser’s address bar. It will look something like this:
yourwebsite.com/wp-admin/nav-menus.php?action=edit&menu=###In this example, the menu ID is 19.
Then use the shortcode as [custom_menu id=”19″].
Example 2: Show product info with:
function custom_view_product_button($atts) {
    $atts = shortcode_atts(array('id' => ''), $atts);
    $product_id = absint($atts['id']);
    if (empty($product_id)) return '';
    $product = wc_get_product($product_id);
    if (!$product) return '';
    $price_html = $product->get_price_html();
    $url = get_permalink($product_id);
    $output = '<div class="product-info">';
    $output .= '<div class="price">' . $price_html . '</div>';
    $output .= '<a href="' . esc_url($url) . '" class="button view-product-button">View Product</a>';
    $output .= '</div>';
    return $output;
}
add_shortcode('view_product', 'custom_view_product_button');
You can find the ID of your product by just hovering over the product name in wordpress and view the ID in the displayed URL at the bottom:
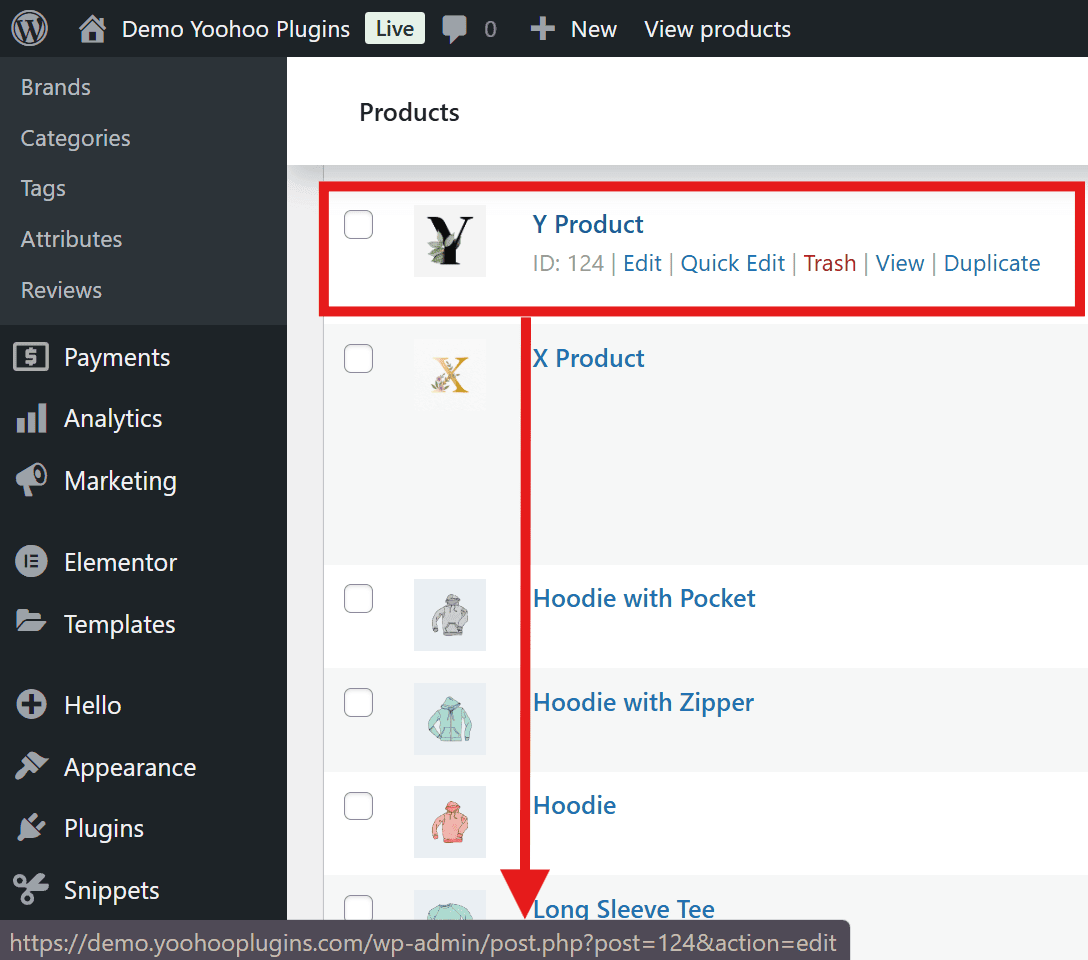
Use the shortcode as [view_product id=”124″].
Best Practices: Keep shortcodes simple, test on staging sites, and document their usage. Avoid overusing them to prevent performance issues, as per WPBeginner’s guide.
Trick: Use attributes to customize outputs, like [custom_menu id="19" class="custom-class"] for styling.
Step 5: Polishing the Design with CSS
CSS is crucial for customizing your site’s appearance beyond themes and builders. It controls colors, fonts, spacing, and layouts, ensuring a unique, professional design.
Why CSS is Important
CSS lets you fine-tune elements, like making buttons bold or aligning content. For demo sites, it’s vital for creating a consistent, branded look. For example, use CSS to make headers sticky, align buttons, or ensure responsiveness.
Learning Resources for CSS
If new to CSS, start with:
- freeCodeCamp: 11-hour YouTube course covering basics to advanced.
- W3Schools: Simple tutorials for beginners.
- MDN Web Docs: Comprehensive documentation.
- Codecademy: Interactive, beginner-friendly course.
- CSS-Tricks: Blog with tutorials and articles.
Tip: Practice with browser developer tools to see changes live.
Trick: Use CSS reset to normalize styles across browsers, ensuring consistency.
Step 6: Testing and Launching
Before launching, follow this checklist:
- Test all links and shortcodes: Ensure functionality, checking for broken links or errors.
- Check responsiveness: View on mobile, tablet, and desktop, adjusting with media queries like @media (max-width: 768px).
- Verify functionality: Test interactive elements, like forms or eCommerce features, using staging sites.
- Optimize performance: Use Google PageSpeed Insights to improve speed, crucial for user retention.
- Review for errors: Look for broken images, missing content, or accessibility issues, using WebAIM’s WCAG Checklist for guidance.
SEO Tip: Use descriptive alt text, structure with headings, and ensure fast load times for better search rankings.
Trick: Use caching plugins like W3 Total Cache for performance boosts.
Conclusion
Building a demo website with free tools and custom code in WordPress is achievable for anyone. By choosing WordPress, using a free theme like Hello Elementor, designing with Elementor Free, adding custom functionality with shortcodes, and polishing with CSS, you can create a professional site without cost. Test thoroughly, leverage learning resources, and start small. Whether showcasing a plugin or a concept, your demo site is within reach.
Happy building!
P.S. If you’re looking to elevate your WooCommerce store, consider how our plugins, like the Name Your Price plugin, can empower your customers to set their own prices within your defined limits, adding flexibility and appeal to your products or services.
Or, if you deal with custom or made-to-order items, our Lead Times plugin can clearly display product availability or manufacturing times, helping your customers make informed purchasing decisions and improving their overall experience.